Ingredients
For the Sushi Rice Layer:
- 3 cups uncooked sushi rice (short-grain Japanese rice)
- 4 cups water
- 1/2 cup rice vinegar
- 3 tablespoons granulated sugar
- 1 tablespoon salt
- 2 tablespoons furikake seasoning
For the Salmon Layer:
- 1 pound fresh salmon fillet (sushi-grade preferred, or canned salmon)
- 8 oz cream cheese, softened
- 1/2 cup Japanese mayonnaise (Kewpie)
- 2 tablespoons sriracha sauce
- 2 tablespoons soy sauce
- 1 tablespoon sesame oil (toasted)
- 2 green onions, finely chopped
For the Topping:
- 1/2 cup Japanese mayonnaise (Kewpie)
- 2 tablespoons sriracha
- 1 tablespoon honey (optional)
- Nori sheets, cut into 2×3-inch rectangles
- Sesame seeds (black and white)
- Sliced cucumber
- Pickled ginger and wasabi
- Tobiko or masago (fish roe) – optional
Instructions
- Prepare Perfect Sushi Rice: Rinse 3 cups sushi rice under cold water until water runs clear. Cook rice with 4 cups water according to package directions or in rice cooker. While rice cooks, combine rice vinegar, sugar, and salt in small saucepan over low heat, stirring until dissolved. Once rice is done, transfer to large shallow bowl, drizzle vinegar mixture over hot rice, and fold gently with rice paddle using cutting motions. Fan the rice while folding to achieve glossy sheen and room-temperature texture.
- Create Creamy Salmon Mixture: If using fresh salmon, preheat oven to 375°F and bake salmon fillet 12-15 minutes until just cooked through and flaky. Let cool slightly, remove skin, and flake into small pieces with fork. In large mixing bowl, combine softened cream cheese, Kewpie mayo, sriracha, soy sauce, and sesame oil—mix vigorously until smooth. Fold in flaked salmon and chopped green onions until evenly distributed. Taste and adjust seasoning.
- Assemble Base Layer: Preheat oven to 425°F. Grease 9×13-inch baking dish or line with parchment paper. Spread seasoned sushi rice evenly across bottom of dish, pressing firmly with wet hands to create compact, uniform layer about 1 inch thick. Sprinkle furikake seasoning generously over rice layer.
- Add Salmon Layer: Dollop creamy salmon mixture over furikake-topped rice, then use offset spatula or back of spoon to spread evenly to all edges. Work gently to avoid disturbing rice layer. Salmon layer should be about 1/2 inch thick and completely cover the rice.
- Create Spicy Mayo Drizzle: In small bowl, whisk together remaining Kewpie mayo and sriracha until well combined and smooth—should be coral-orange color. Transfer to squeeze bottle or zip-top bag with corner snipped. Drizzle spicy mayo over salmon layer in zigzag or crosshatch pattern.
- Bake to Golden Perfection: Place assembled dish in preheated oven and bake 10-12 minutes until heated through and edges bubble. Switch oven to broil (high setting) for final 2-3 minutes, watching carefully to prevent burning. Top should develop golden-brown spots and slightly blistered appearance. Alternatively, use kitchen torch to caramelize mayo topping.
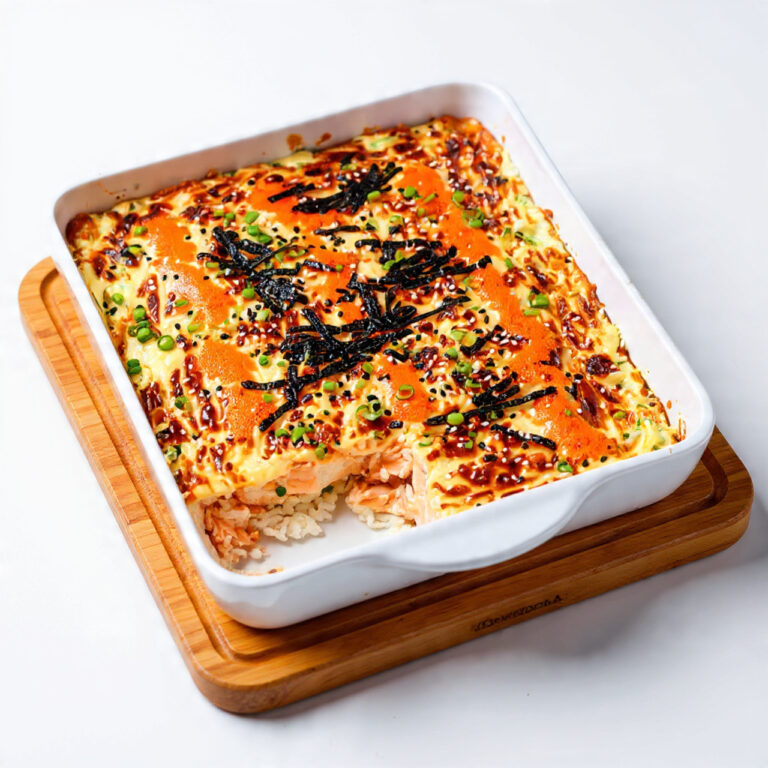
- Garnish and Serve: Remove from oven and let rest 3-5 minutes. Immediately garnish with sesame seeds (both colors), additional furikake, sliced green onions, and tobiko if using. Cut nori sheets into rectangles. Serve hot directly from dish, allowing guests to scoop portions onto nori sheets like handheld tacos. Provide sliced cucumber, pickled ginger, and wasabi on side.
Notes
Substitution Tips:
- Use canned salmon (pink or sockeye) for budget-friendly option—drain thoroughly and flake
- Replace Kewpie mayo with regular mayo plus 1 tsp rice vinegar and 1/2 tsp sugar
- Substitute tamari for soy sauce to make gluten-free
- Try smoked salmon instead of baked for deeper flavor with no cooking
- Use vegan cream cheese and mayo for dairy-free version
Rice Success Tips:
- Always rinse sushi rice until water runs clear to prevent mushiness
- Let cooked rice cool to room temperature before assembling—hot rice makes cream cheese melt
- Use short-grain Japanese rice only; long-grain won’t achieve proper sticky texture
- Press rice firmly into pan for compact layer that holds together when serving
Make-Ahead Instructions:
- Cook sushi rice up to 2 days ahead; store covered and bring to room temperature before using
- Prepare salmon mixture 1 day ahead and refrigerate
- Assemble entire dish (except mayo topping) up to 24 hours ahead, cover, and refrigerate
- Add spicy mayo drizzle just before baking; bake from cold, adding 3-5 minutes to time
Storage:
- Refrigerate leftovers in airtight container up to 3 days
- Store nori sheets separately to prevent sogginess
- Reheat individual portions in microwave 1-2 minutes
- Freezing not recommended—rice becomes grainy and cream cheese separates
Pro Tips:
- Watch broiler constantly—mayo burns quickly, going from golden to burnt in 30 seconds
- Use kitchen torch for more controlled caramelization and dramatic presentation
- Double the furikake layer for extra umami punch
- Serve immediately for best crispy-creamy texture contrast
- Prep Time: 20 minutes
- Cook Time: 15 minutes
- Category: Main Course
- Method: Baking
- Cuisine: Japanese Fusion
- Diet: High Protein