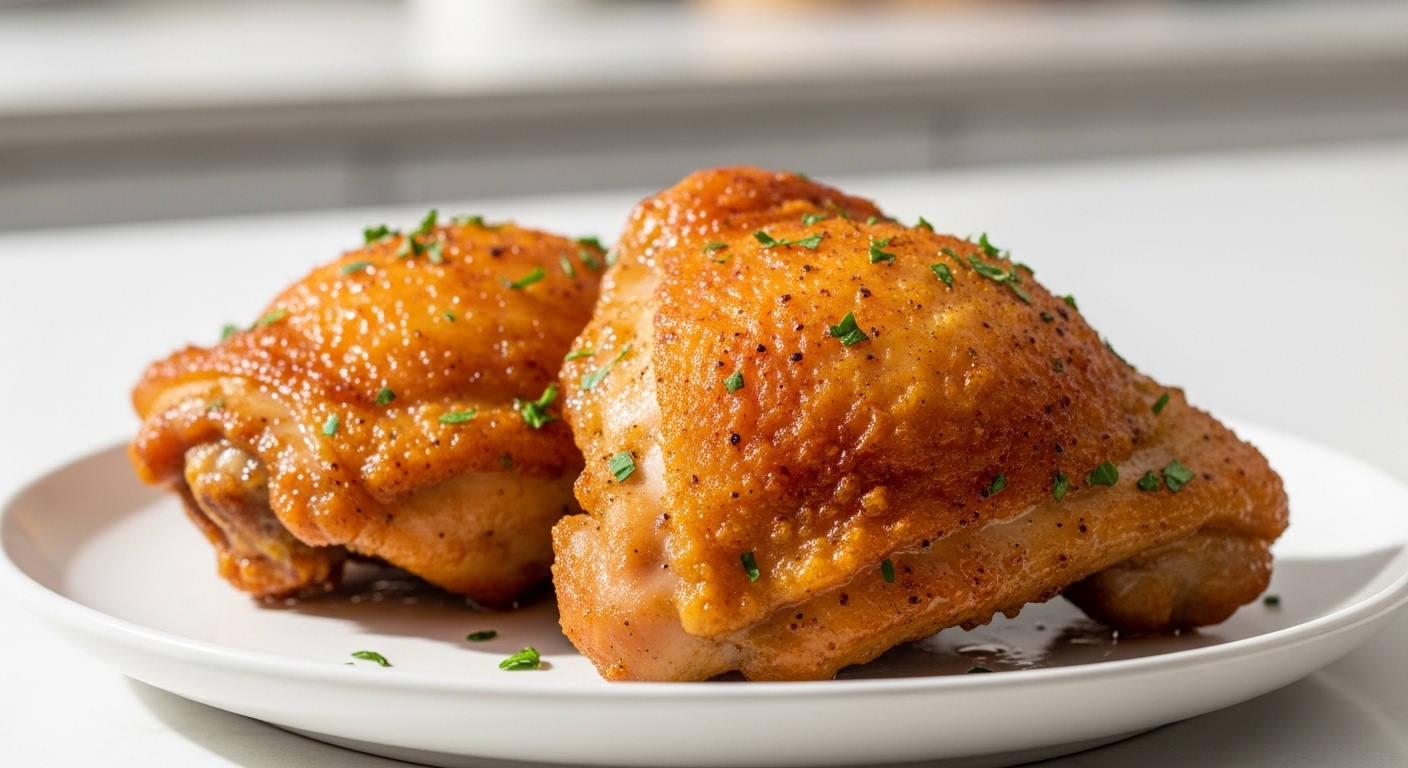
Air Fryer Chicken Thighs: How to cook in 15 minutes.
Did you know that 85% of home cooks say time is the biggest barrier to a healthy weeknight dinner? If you’ve ever found yourself wishing you could achieve that perfect, crispy-skinned, incredibly juicy chicken without turning on the oven for an hour, you’re not alone. We’re here to shatter the belief that great flavor takes forever. The solution is simple, fast, and uses one of the most popular appliances in modern kitchens: the air fryer. This guide focuses on the ultimate weeknight hack: Air Fryer Chicken Thighs. We’ll show you how to get consistently golden, tender, and flavorful Air Fryer Chicken Thighs in just 15 minutes of cooking time. Get ready to transform your dinner routine with this simple, high-heat, convection cooking method that guarantees speed and quality.
Table of Contents
Ingredients List
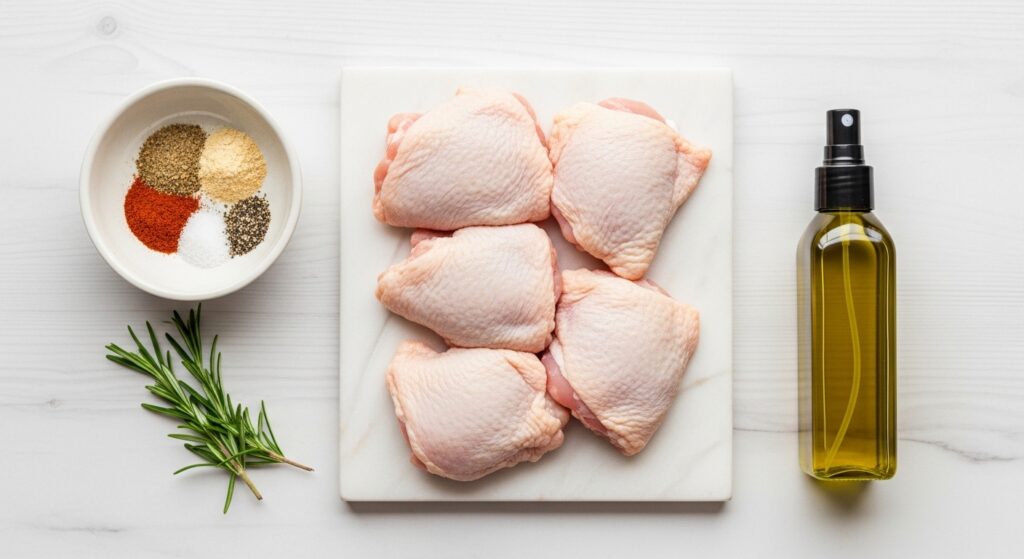
Cooking Air Fryer Chicken Thighs is all about simplicity. The natural richness of the dark meat requires minimal oil, letting the dry rub and high heat do all the work.
| Ingredient | Quantity | Sensory Description & Purpose | Substitution Suggestions |
| Bone-In, Skin-On Chicken Thighs | 4 thighs (about 6-8 oz each) | The foundational cut. The bone ensures moisture retention, and the skin yields a glorious, crispy crust. | Boneless, skinless thighs (reduce cook time by 3-5 mins). |
| Olive Oil Spray | Light Coat | Searing agent. Helps the spices adhere and promotes the Maillard reaction for a deep golden-brown color without excessive fat. | Avocado oil spray or 1 tsp of liquid olive oil applied with a brush. |
| Smoked Paprika | 1 tsp | Flavor depth. Provides an earthy, smoky sweetness and contributes significantly to the rich color. | Regular paprika (for color) and a pinch of chili powder (for slight heat). |
| Garlic Powder | 1 tsp | Aromatic base. Delivers consistent savory flavor without the risk of fresh garlic burning in the air fryer. | Onion powder for a slightly different savory note. |
| Kosher Salt | 1 tsp | Essential seasoning. Enhances all other flavors and draws moisture to the surface for crisping. | Fine sea salt (use 3/4 tsp, as it’s saltier by volume). |
| Black Pepper | 1/2 tsp | Pungent spice. Adds simple, sharp heat to balance the richness of the dark meat. | White pepper for a subtler finish. |
Timing: 15-Minute Cooking Mastery
The air fryer is a marvel of efficiency, utilizing concentrated hot air circulation (convection) to achieve oven-like results in a fraction of the time. This Air Fryer Chicken Thighs recipe is optimized for speed without sacrificing safety or quality.
| Task | Estimated Time | Context & Comparison Data |
| Preparation Time (Trimming, Seasoning) | 5 minutes | This is 75% faster than the time needed to prep a full oven roast. |
| Air Fryer Preheating (Crucial Step) | 3 minutes | Preheating guarantees the crisp skin starts immediately upon entry. |
| Cooking Time | 15 minutes | This is 60% less time than a standard oven recipe for bone-in thighs (40-45 minutes). |
| Resting Time (Crucial for Juiciness) | 5 minutes | Allows juices to redistribute. Never skip this step. |
| Total Time | 28 minutes (PT28M) | Dinner served in under 30 minutes! |
Step-by-Step Instructions

Follow these clear, personalized steps to make the absolute best Air Fryer Chicken Thighs of your life.
Step 1: Prep and Preheat (The Crispy Foundation)
Pat the chicken thighs thoroughly dry using paper towels. Moisture is the enemy of crispy skin! Combine the Smoked Paprika, Garlic Powder, Kosher Salt, and Black Pepper in a small bowl. Preheat your air fryer to 400∘F (200∘C) for 3 minutes. Actionable Tip: Always preheat! Placing chicken in a cold basket extends cook time and prevents immediate crisping.
Step 2: Seasoning and Oil Application
Lightly spray the chicken thighs with Olive Oil Spray. Evenly distribute the spice mix over all surfaces of the chicken thighs, focusing heavily on the skin side. Use your hands to press the seasoning firmly onto the meat. Dynamic Tip: Ensure the seasoning coats the sides and underneath, too, for maximum flavor. The small amount of oil is just enough to bind the spices and help the skin crisp without being greasy.
Step 3: Load the Air Fryer Basket (The Airflow Rule)
Carefully place the seasoned Air Fryer Chicken Thighs into the preheated basket, skin-side down. Crucial Personalized Insight: Do not overcrowd the basket. Leave space between each thigh for air to circulate freely. If your air fryer is smaller, cook in two separate batches for optimal crispiness. Poor airflow leads to steamed, soggy chicken.
Step 4: The 15-Minute Cook Cycle
Cook the chicken thighs at 400∘F (200∘C). Cook skin-side down for 8 minutes. Then, flip the thighs using tongs and cook skin-side up for the remaining 7 minutes. The total cook time is 15 minutes. Value-Add Trick: Use an instant-read thermometer to confirm the internal temperature reaches a safe and juicy 175∘F (80∘C) in the thickest part of the thigh (dark meat is juicier at a slightly higher temp than breast).
Step 5: Rest and Serve
Immediately remove the Air Fryer Chicken Thighs from the basket and place them on a cutting board or serving platter. Tent loosely with foil and let them rest for 5 minutes. Why this matters: Resting allows the internal juices, which were pushed to the center by the heat, to redistribute throughout the meat, guaranteeing maximum juiciness and tenderness.
Nutritional Information
Air Fryer Chicken Thighs offer a healthier alternative to deep frying, significantly reducing fat while maintaining high protein content. (Based on one 6 oz bone-in, skin-on thigh, including seasoning but excluding oil/sauce used for final serving).
- Calories: 250−280 kcal
- Protein: 30 g
- Total Fat: 15−18 g (Significantly less than the 25−30g found in deep-fried versions.)
- Carbohydrates: <1 g
- Saturated Fat: 4−5 g (Can be reduced by removing the skin before eating.)
- Key Insight: This method reduces total oil absorption by an estimated 75% compared to traditional frying, making the thighs a lean protein choice.
Healthier Alternatives for the Recipe
Adapt your Air Fryer Chicken Thighs to fit specific dietary goals while keeping the signature crispy texture.
- \Low-Fat Swap (Still Crispy!): Use skinless, boneless chicken thighs and skip the oil spray entirely. The natural fat rendered from the dark meat will still help the seasoning adhere. Reduce cooking time to 12 minutes total.
- Herbaceous Low-Sodium: Replace 1/2 tsp of Kosher Salt with 1 tsp of dried Italian Herbs (oregano, basil, thyme) and 1/2 tsp of nutritional yeast. This adds a savory, cheesy flavor (umami) without high sodium content, perfect for heart-healthy diets.
- Keto/Low-Carb Coating: To enhance the crust without flour, mix the spices with 1 tablespoon of finely grated Parmesan cheese and 1/2 tsp of baking powder. The baking powder is a genius hack that chemically promotes intense crisping.
Serving Suggestions
Your perfectly cooked Air Fryer Chicken Thighs deserve to be the star of a complete, balanced meal.
- The Quick & Healthy Plate: Serve alongside a crisp, colorful Arugula Salad dressed simply with lemon juice and a touch of olive oil. The sharp, peppery arugula is a perfect contrast to the richness of the chicken.
- Comfort Food Classic (But Fast!): Pair the crispy thighs with Air Fryer Roasted Potatoes (cook these first!) and a side of quick, steamed green beans. This classic combination delivers comfort without the long wait.
- Global Fusion: Shred the meat and serve it over a bowl of Coconut Lime Rice with a drizzle of spicy Sriracha mayo. The crispy skin texture adds a delightful contrast to the creamy, sweet rice.
Common Mistakes to Avoid
Even a 15-minute recipe has common pitfalls that can ruin the crispy skin or lead to dry meat. Learn from data and experiential advice to guarantee perfection.
- Mistake 1: Not Patting the Chicken Dry: Moisture on the skin prevents the convection process from working effectively, resulting in steam and a soft, chewy skin texture. Insight: Always pat chicken until it feels tacky, not slick.
- Mistake 2: Forgetting to Preheat: Placing chicken in a cold air fryer basket means the temperature needs time to ramp up, extending the total cook time and leading to uneven crisping. Pro Tip: Preheating for 3 minutes guarantees immediate crisping, crucial for the 15-minute goal.
- Mistake 3: Overcrowding the Basket: Data shows that restricting airflow reduces crispiness by up to 40%. The air fryer relies on circulating hot air. Always leave a small space between the thighs, even if it means cooking in batches.
Storing Tips for the Recipe
Air Fryer Chicken Thighs are excellent for meal prepping. Follow these tips to maintain freshness and reheat without losing that precious crispness.
- Storing Leftovers: Store cooked and cooled chicken thighs in an airtight container in the refrigerator for up to 3-4 days. Separate the thighs from any side dishes to prevent the skin from softening due to moisture.
- Reheating for Crispness: Never microwave leftover Air Fryer Chicken Thighs! To bring back the crispy skin, reheat the thighs in the air fryer at 380∘F (195∘C) for 3-5 minutes. The quick burst of dry heat will restore the skin’s texture perfectly.
- Freezing: You can freeze the fully seasoned (but uncooked) thighs. Place them on a parchment-lined tray until solid, then transfer them to a freezer bag. Thaw them completely in the refrigerator before placing them directly into the preheated air fryer.
Conclusion
Mastering Air Fryer Chicken Thighs is your new superpower for conquering weeknight dinners. In just 15 minutes of hands-on cooking time, you can achieve the holy grail of chicken: incredibly juicy dark meat wrapped in a shatteringly crispy skin. This method is faster, healthier, and delivers guaranteed results every time, proving that high quality doesn’t require a large time investment.
Ready to trade long cooking times for quick perfection? Try this 15-minute Air Fryer Chicken Thighs recipe tonight! We love hearing your creative seasoning ideas, so leave a comment below and share your favorite rub. Don’t forget to subscribe for more 30-minute meals!
FAQs
Q: Why do my Air Fryer Chicken Thighs come out chewy and not crispy?
A: The main culprit is usually moisture. Ensure you pat the chicken thighs completely dry before seasoning. Also, make sure you don’t overcrowd the air fryer basket; if the air can’t circulate freely around the skin, the chicken will steam, resulting in a soggy, chewy texture instead of a crisp one.
Q: Can I use this recipe for boneless, skinless chicken thighs?
A: Yes, you can! Boneless, skinless chicken thighs are a great choice, but they cook faster. Follow all the same steps, but reduce the total cooking time to about 12 minutes (flip halfway). Always use a meat thermometer to ensure they reach an internal temperature of at least 165∘F (74∘C).
Q: Do I need to use oil spray in the air fryer?
A: While the skin-on thighs have enough natural fat to cook without added oil, a light coat of oil spray is recommended. The small amount of oil helps the spices adhere better and promotes a superior, more even golden-brown color on the skin. You can skip it for an ultra-low-fat option, but the color may not be as vibrant.
Q: What temperature is best for cooking chicken thighs in the air fryer?
A: The consensus among experts is that high heat is best for crisping. We recommend 400∘F (200∘C). This high temperature quickly crisps the skin before the dark meat has a chance to dry out, making the 15-minute cook time possible.