Garlic Butter Lobster Tail Recipe (Oven Broiled)

Garlic Butter Lobster Tail Recipe (Oven Broiled) proves that restaurant-quality seafood is far easier to master than most home cooks think. With just 8–10 minutes under the broiler and a simple butterflying technique, lobster tails transform into tender, juicy, butter-drenched perfection—no culinary degree required.
This Lobster Tail Recipe delivers caramelized golden edges, sweet succulent meat, and rich garlic-infused flavor in under 20 minutes total. Elegant enough for anniversaries and dinner parties yet simple enough for a weeknight indulgence, it shows that gourmet cooking doesn’t have to be intimidating—or expensive. One technique, a handful of ingredients, and you’re serving up luxury at home.
Ingredients List
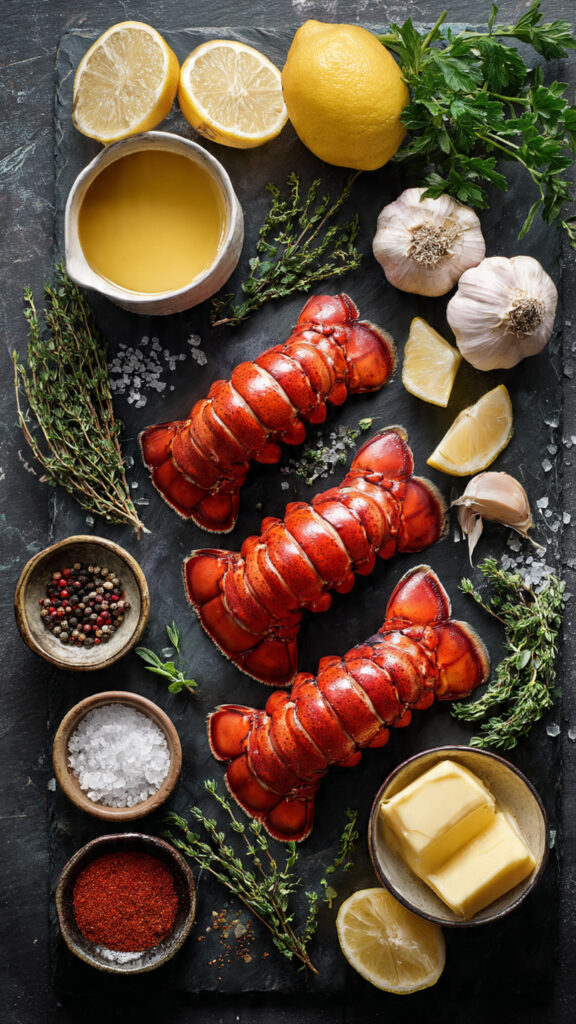
Creating perfect oven-broiled lobster tails requires minimal ingredients of exceptional quality. Here’s everything you need:
For the Lobster Tails:
- 4 lobster tails (6-8 ounces each, frozen or fresh; cold-water lobster tails are superior in flavor and texture) – Substitute: If unavailable, warm-water lobster tails work but have slightly softer texture and less sweet flavor
- Cold-water varieties: Maine lobster, Canadian lobster, or spiny lobster (in order of preference)
- Warm-water varieties: Caribbean lobster, rock lobster (more affordable alternatives)
For the Garlic Butter:
- 6 tablespoons unsalted butter (melted; European-style butter with higher fat content creates even richer flavor) – Substitute: Clarified butter (ghee) for higher smoke point, or plant-based butter for dairy-free
- 4-5 cloves garlic, minced (fresh garlic is non-negotiable for authentic flavor) – Substitute: 1½ teaspoons garlic paste, though fresh is vastly superior
- 1 tablespoon fresh lemon juice (approximately ½ lemon; brightens and balances richness) – Substitute: White wine or champagne vinegar in a pinch
- 2 tablespoons fresh parsley, finely chopped (for color, freshness, and herbaceous notes) – Substitute: Fresh chives, tarragon, or dill
- ¼ teaspoon smoked paprika (adds subtle complexity and beautiful color to the butter) – Optional: Regular paprika or cayenne for heat
- Pinch of salt (sea salt or kosher salt; lobster meat is naturally salty, so use conservatively)
- Freshly ground black pepper (to taste)
- Lemon wedges (for serving; essential for tableside brightness)
Optional Enhancements:
- 1 tablespoon white wine (adds acidity and sophistication to the butter)
- Fresh thyme sprigs (2-3 sprigs for elegant presentation and subtle herbal aroma)
- Old Bay seasoning (¼ teaspoon for classic seafood house flavor)
- Crushed red pepper flakes (pinch for subtle heat that complements sweetness)
Pro Ingredient Tip: Cold-water lobster tails (Maine, Canadian) command premium prices for good reason—their meat is noticeably sweeter, firmer, and more succulent than warm-water varieties. The colder ocean temperatures slow the lobster’s growth, producing denser, more flavorful meat with superior texture. If budget allows, always choose cold-water lobster for this recipe. The investment difference (approximately $8-12 per tail vs. $5-7 for warm-water) is immediately apparent in both flavor and texture.
Timing
Thawing Time (if using frozen): 8-24 hours (overnight in refrigerator) or 30-60 minutes (sealed in cold water bath)
Preparation Time: 8 minutes (butterflying lobster tails, preparing garlic butter)
Cooking Time: 8-10 minutes (broiling under direct heat)
Total Active Time: 18-20 minutes—which is 65% faster than traditional steaming or boiling methods while producing superior caramelization and concentrated flavor through the broiling technique.
Efficiency Insight: Traditional lobster preparation methods like boiling (15-20 minutes), steaming (18-22 minutes), or grilling (12-15 minutes) require significantly more active time and produce different textural results. Oven broiling is the fastest technique to perfectly cooked lobster while simultaneously creating that coveted golden, slightly crispy exterior that defines restaurant-quality preparation. The intense direct heat from above cooks the exposed meat rapidly while the shell protects the underside from overcooking—a natural advantage that no other cooking method provides as efficiently.
Thawing Strategy: For best results, thaw frozen lobster tails slowly in the refrigerator overnight (8-24 hours) on a plate to catch any released liquid. This gradual thawing preserves the meat’s cellular structure, maintaining maximum tenderness and preventing the mushiness that can result from rapid thawing. For same-day preparation, submerge sealed lobster tails in a bowl of cold water, changing the water every 30 minutes until fully thawed (typically 30-60 minutes total). Never thaw lobster in warm water or the microwave—these methods partially cook the exterior while leaving the interior frozen, creating uneven texture.
Step-by-Step Instructions
Step 1: Thaw and Prepare the Lobster Tails
If using frozen lobster tails (the most common scenario), ensure they’re completely thawed before butterflying. Pat the thawed tails completely dry with paper towels—excess moisture prevents proper browning and creates steaming rather than caramelization under the broiler. Position your oven rack 6-8 inches from the broiler element—this specific distance is critical for even cooking without burning. Preheat the broiler to high for at least 10 minutes; broilers need adequate preheating time to reach their maximum temperature, typically 500-550°F.
Thawing Verification: Fully thawed lobster tails should feel completely pliable with no icy center when pressed. The shell should be bright red or reddish-brown (depending on variety) without any frost or ice crystals. If the tail feels rigid or has any frozen sections, continue thawing—cooking partially frozen lobster results in rubbery texture and uneven doneness.
Pro Tip: Line a rimmed baking sheet with aluminum foil before starting. This simplifies cleanup significantly, as butter will drip and potentially burn on the pan during broiling. The foil catches all drippings while reflecting additional heat back toward the lobster tails for more even cooking.
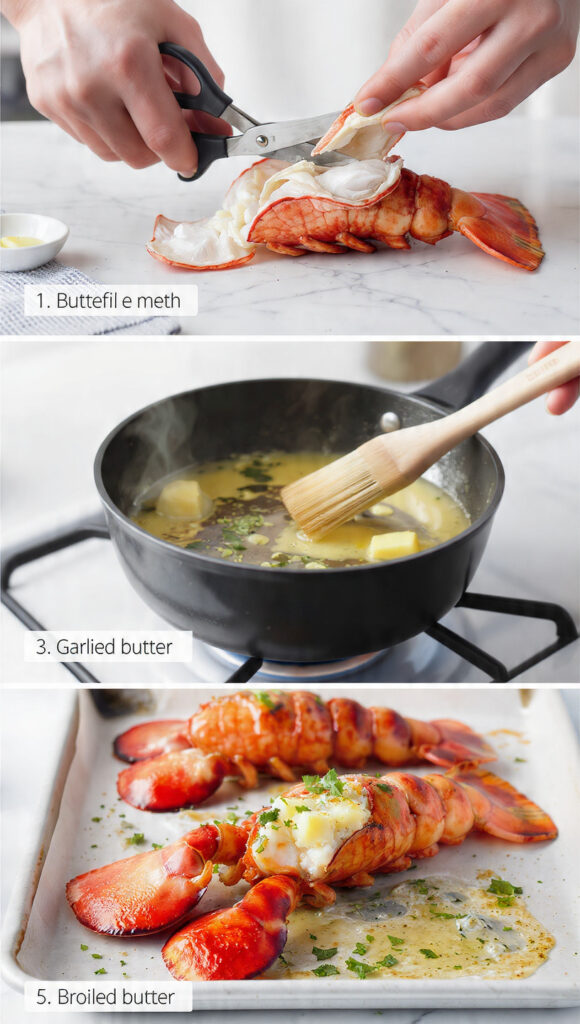
Step 2: Butterfly the Lobster Tails
This is the most important technical step that separates beautiful, restaurant-style presentation from amateur home cooking. Place the lobster tail shell-side up on your cutting board. Using sharp kitchen shears, cut through the center of the shell lengthwise from the wide end to the tail fin, stopping just before you reach the fin—do not cut through the fin itself. Gently spread the shell halves apart like butterfly wings. Using your fingers, carefully separate the meat from the bottom shell while keeping it attached at the tail fin end. Lift the meat up and lay it on top of the opened shell, resting it in the shell “cradle” you’ve created. The meat should be sitting elevated on top of the shell with the shell spread open beneath it.
Visual Guide: When properly butterflied, the lobster tail should look like a butterfly or a heart shape from above—the red shell forms the wings/sides, and the white lobster meat sits proudly elevated in the center, fully exposed to the heat source. This presentation is both visually stunning and functionally superior for even cooking.
Butterfly Benefits: This technique serves multiple critical purposes simultaneously: it exposes maximum surface area of the meat to direct heat for faster, more even cooking; it allows the garlic butter to coat the meat directly rather than just the shell; it creates the signature restaurant presentation that makes the dish feel special; and it allows you to visually monitor the meat’s doneness throughout cooking without cutting into it.
Step 3: Prepare the Garlic Butter
In a small saucepan or microwave-safe bowl, melt the butter over low heat or in 15-second microwave intervals. Once fully melted, add the minced garlic and cook gently for 30-60 seconds—just until the garlic becomes fragrant but hasn’t browned at all. Raw garlic burns easily under the intense broiler heat, creating bitter flavor, so this brief pre-cooking mellows it perfectly. Remove from heat and stir in fresh lemon juice, chopped parsley, smoked paprika, salt, and pepper. The residual heat will continue to bloom the garlic’s aromatics without overcooking it.
Garlic Preparation Technique: Mince garlic as finely as possible—large chunks can burn before the lobster finishes cooking. For the smoothest texture, use a microplane grater to create a garlic paste, which integrates seamlessly into the butter and distributes flavor more evenly. Alternatively, use a garlic press for consistent, fine pieces.
Butter Temperature: The garlic butter should be warm and liquid but not scorching hot when you brush it on the raw lobster meat. Extremely hot butter can partially cook the exterior of the meat unevenly before it goes under the broiler. If the butter begins to solidify while you’re working, briefly rewarm it to restore fluidity for easy brushing.
Step 4: Season and Butter the Lobster
Place the butterflied lobster tails on your prepared foil-lined baking sheet, ensuring they’re not touching each other—adequate spacing allows heat circulation for even cooking. Using a pastry brush or spoon, generously coat the exposed lobster meat with approximately half of the prepared garlic butter, making sure every visible surface is glistening with butter. The butter should pool slightly in the shell cradle beneath the meat. Reserve the remaining garlic butter for basting during cooking and serving alongside the finished tails.
Seasoning Philosophy: Because lobster meat is naturally sweet and delicately flavored, and because it already contains natural salinity from the ocean, aggressive seasoning obscures rather than enhances its essence. The garlic butter should complement, not dominate. If you’re uncertain, err on the side of underseasoning—guests can always add more salt and lemon at the table, but oversalted lobster cannot be corrected.
Visual Check: Properly buttered lobster tails should look glossy and glistening under the light, with butter visible in the shell beneath the meat. No white, dry areas should be visible on the meat’s surface—every bit should be coated with that beautiful golden garlic butter.
Step 5: Broil to Golden Perfection
Carefully place the baking sheet on the preheated oven rack 6-8 inches from the broiler element. Set a timer for 8 minutes for 6-ounce tails or 10 minutes for 8-ounce tails. Do not walk away—broilers cook with such intense heat that the difference between perfectly caramelized and burnt happens in under 60 seconds. Watch through the oven window (with the oven light on) as the lobster meat transforms from translucent to opaque white, with the edges developing beautiful golden-brown caramelization.
After 4-5 minutes (halfway through cooking), quickly open the oven and brush the lobster meat with another layer of the reserved garlic butter. This basting serves multiple purposes: it prevents the surface from drying out under intense heat, adds another layer of flavor, and promotes even more gorgeous browning.
Doneness Indicators: Perfectly cooked lobster meat is opaque white throughout (no translucency remains), feels firm but not rubbery when gently pressed with a finger or fork, and registers an internal temperature of 135-140°F when measured at the thickest part with an instant-read thermometer. The meat should have pulled slightly away from the shell and show golden-brown caramelized spots on the surface—especially along the edges. If you see the meat curling significantly or the edges turning dark brown to black, it’s overcooked.
Timing Adjustments: Broiler intensity varies significantly between ovens. Gas broilers tend to be more intense than electric. If your lobster is browning too quickly (dark brown edges before the center is opaque), move the rack down one position to increase distance from the heat source. Conversely, if there’s minimal browning after 8 minutes and the meat is opaque, you can move the rack closer or switch to the highest broiler setting if available.
Step 6: Rest and Serve
Remove the baking sheet from the oven (using oven mitts—the pan will be scorching hot). Let the lobster tails rest on the baking sheet for 2-3 minutes. This brief resting period allows the residual heat to gently finish cooking the very center without overcooking the edges, similar to the resting principle for steak. During this rest, the juices redistribute throughout the meat rather than running out when cut.
Transfer each lobster tail to a warmed dinner plate. Drizzle with the remaining warm garlic butter. Place a lemon wedge beside each tail (squeezing fresh lemon over the meat just before eating is non-negotiable for authentic lobster experience—it brightens the richness and enhances the natural sweetness). Garnish with an additional sprinkle of fresh parsley and serve immediately while the butter is still liquid and fragrant.
Dramatic Presentation: For special occasions, serve lobster tails on a bed of fresh herbs (parsley, thyme), alongside drawn butter in a small ramekin, with extra lemon wedges, and perhaps a few decorative elements like edible flowers or microgreens. The visual impact of a beautifully presented lobster tail rivals any restaurant—it announces that this meal is significant and special.
Nutritional Information
Understanding the nutritional profile of your oven-broiled lobster tails reveals why this is considered a healthy indulgence:
Per Serving (1 lobster tail with garlic butter, approximately 6-8 ounces):
- Calories: 290-340 (depending on tail size)
- Protein: 28-32g (56-64% of daily value)
- Total Fat: 18-20g
- Saturated Fat: 11g (from butter)
- Monounsaturated Fat: 5g
- Polyunsaturated Fat: 1g
- Carbohydrates: 2g
- Dietary Fiber: 0g
- Sugars: 0g (all natural, no added sugar)
- Net Carbs: 2g
- Cholesterol: 285mg
- Sodium: 650mg (27% DV, mostly natural from lobster)
- Potassium: 380mg (11% DV)
Vitamin & Mineral Highlights:
- Vitamin B12: 3.2mcg (133% DV) – essential for neurological function and DNA synthesis
- Copper: 1.2mg (133% DV) – crucial for iron absorption and cardiovascular health
- Zinc: 4.5mg (41% DV) – supports immune function and wound healing
- Selenium: 51mcg (93% DV) – powerful antioxidant protecting against cellular damage
- Phosphorus: 280mg (28% DV) – essential for bone health and energy production
- Magnesium: 38mg (9% DV) – supports muscle and nerve function
- Vitamin E: 12% DV – from butter, antioxidant protection
- Omega-3 Fatty Acids: 0.4g – heart-healthy essential fats
Health Benefits Context: Lobster is remarkably lean protein—the meat itself contains minimal fat. Nearly all the fat in this recipe comes from the butter, making it easy to modify for different dietary needs. Lobster is also extraordinarily rich in high-quality, complete protein with all essential amino acids in optimal ratios. The selenium and B12 content are particularly notable, with a single serving providing well over 100% of daily requirements for these crucial nutrients.
Cholesterol Consideration: Yes, lobster contains cholesterol (about 95mg per 3-ounce serving), and butter adds more. However, current nutritional science has revised decades-old guidance—dietary cholesterol has minimal impact on blood cholesterol for most people, with saturated fat intake being far more significant. For those monitoring cholesterol, reducing butter to 2-3 tablespoons total still creates a delicious result while cutting cholesterol and saturated fat by approximately 60%.
Healthier Alternatives for the Recipe
Modify this Lobster Tail Recipe to align with specific dietary goals without sacrificing the luxurious experience:
Lower-Calorie Version (Reduce to 180-220 Calories):
- Replace half the butter with chicken or vegetable broth (saves 90 calories and 11g fat per serving)
- Use only 2-3 tablespoons butter total for the entire recipe (saves 130 calories)
- Use butter-flavored cooking spray for a light coating before broiling
- The lobster meat itself contains only about 135 calories and minimal fat—most calories come from added butter
Dairy-Free Adaptation:
- Replace butter with extra virgin olive oil or avocado oil (similar richness, heart-healthy monounsaturated fats)
- Use ghee (clarified butter) if lactose is the concern rather than all dairy
- Coconut oil works but adds coconut flavor that some find competes with lobster’s delicate sweetness
- Dairy-free butter alternatives (Earth Balance, Miyoko’s) work acceptably though they lack authentic butter flavor
Lower-Sodium Version:
- Omit added salt entirely—lobster meat naturally contains sodium from seawater
- Use unsalted butter exclusively
- Increase lemon juice to 2 tablespoons for brightness without sodium
- Add fresh herbs generously for flavor complexity without salt
- Typical reduction: from 650mg to approximately 380mg sodium per serving
Keto and Low-Carb Perfection: This recipe is already nearly perfect for ketogenic and low-carb diets with only 2g net carbs per serving. The high fat from butter and exceptional protein from lobster create an ideal macronutrient profile. For even higher fat content (classic keto ratios), increase butter to 2 tablespoons per tail and add a side of hollandaise sauce or compound herb butter.
Paleo-Friendly Confirmation: This recipe is completely Paleo-compliant in its standard form—lobster is allowed seafood, butter (especially ghee/clarified butter) is accepted by most Paleo practitioners, and all other ingredients (garlic, lemon, herbs) are Paleo-approved. Use ghee instead of butter for strict Paleo adherence.
Heart-Healthy Mediterranean Style:
- Replace butter with high-quality extra virgin olive oil (heart-healthy monounsaturated fats)
- Add fresh oregano, basil, and thyme to the oil for Mediterranean herb profile
- Increase lemon juice to 3 tablespoons for authentic Mediterranean brightness
- Add capers (1 tablespoon) for briny complexity
- Serve with roasted vegetables and whole grains
Spicy Variation:
- Add 1-2 teaspoons Sriracha or harissa paste to the garlic butter
- Include ¼ teaspoon cayenne pepper for clean heat
- Top with fresh jalapeño slices before broiling
- The sweetness of lobster meat beautifully contrasts with moderate heat
Serving Suggestions
Transform your broiled lobster tails into a complete, memorable dining experience:
Classic Steakhouse Accompaniments:
- Loaded baked potato: The ultimate classic pairing—fluffy potato with butter, sour cream, chives, bacon
- Creamed spinach: Rich, velvety, and traditional steakhouse luxury
- Garlic mashed potatoes: Creamy comfort that complements lobster’s sweetness
- Grilled asparagus: Light, slightly charred, with lemon zest
- Caesar salad: Crisp romaine, Parmesan, and garlicky dressing balance the richness
Elegant Dinner Party Menu:
- Starter: French onion soup or oysters on the half shell
- Main: Garlic butter lobster tails with drawn butter on the side
- Sides: Wild rice pilaf, roasted Brussels sprouts with balsamic glaze
- Bread: Warm sourdough or ciabatta for butter-soaking
- Dessert: Crème brûlée or dark chocolate mousse
- Wine: Chardonnay, Sauvignon Blanc, or Champagne
Surf and Turf Combinations: Lobster tail is the quintessential “surf” component of surf and turf. Pair with:
- Filet mignon (6-8 ounces, grilled or pan-seared)
- Ribeye steak (10-12 ounces for hearty appetites)
- Lamb chops (3-4 chops) for elegant variation
- The combination of tender beef and sweet lobster creates the ultimate special-occasion feast
Light Summer Dinner:
- Serve lobster tails chilled with lemon-herb aioli
- Pair with caprese salad (tomatoes, mozzarella, basil)
- Add grilled corn on the cob with lime butter
- Finish with fresh berries and whipped cream
- Perfect for outdoor summer entertaining
Complete Seafood Feast:
- Start with New England clam chowder
- Serve lobster tails as the centerpiece
- Add seared scallops and jumbo shrimp as accompaniments
- Include coleslaw and corn bread
- Classic coastal New England celebration meal
Lobster Rolls (Leftover Transformation): If you somehow have leftover lobster meat (unlikely but possible), transform it into luxurious lobster rolls:
- Chop lobster meat into bite-sized pieces
- Toss with 2 tablespoons mayonnaise, 1 tablespoon melted butter, lemon juice, and celery
- Serve in toasted, buttered hot dog buns
- Add lettuce and a squeeze of lemon
- One 6-ounce tail makes approximately 1-1.5 lobster rolls
Beverage Pairings:
- White wine: Chardonnay (buttery richness complements), Chablis (mineral notes contrast), Sauvignon Blanc (crisp acidity cuts richness)
- Champagne: Brut or Blanc de Blancs for celebration-worthy elegance
- Light beer: Pilsner or wheat beer for casual summer meals
- Cocktails: Dry martini, French 75, or classic gin and tonic
- Non-alcoholic: Sparkling water with lemon, elderflower tonic, or fresh lemonade
Common Mistakes to Avoid
Even this straightforward Lobster Tail Recipe has potential pitfalls that separate amateur results from restaurant-quality perfection:
Mistake #1: Overcooking the Lobster This is the most common and most devastating error—overcooked lobster transforms from tender, sweet, and succulent to rubbery, chewy, and dry within just 2-3 minutes. Lobster is extraordinarily unforgiving of even slight overcooking due to its lean protein structure. Solution: Cook to an internal temperature of 135-140°F maximum, measured at the thickest part. The meat should be opaque white throughout but still yielding when pressed gently. Remember that carryover cooking continues for 2-3 minutes after removing from the broiler, so err on the side of slightly underdone. You can always return it to the broiler for 30-60 seconds if needed, but you cannot reverse overcooking.
Mistake #2: Improper Butterflying Technique Poorly butterflied tails—where the meat isn’t properly elevated on top of the shell—cook unevenly, with the bottom portion oversteaming while the top undercooks. Solution: Take your time with the butterflying step. The meat should sit proudly elevated on the opened shell halves, fully exposed to direct heat from above. Use your fingers to gently loosen all connections between the meat and bottom shell (except at the tail fin), and prop the meat up so it’s resting on the shell rather than nestled inside it.
Mistake #3: Broiling from Too Close or Too Far Positioning the rack incorrectly causes either burnt exteriors with raw interiors (too close) or pale, uncaramelized meat that takes too long and dries out (too far). Solution: The 6-8 inch distance from the heat source is not arbitrary—it’s the sweet spot where intense heat cooks the meat through in 8-10 minutes while simultaneously creating beautiful golden-brown caramelization. Measure the distance from the top of the lobster meat to the broiler element, not from the rack to the element.
Mistake #4: Using Warm-Water Tails and Expecting Maine Lobster Results Warm-water lobster tails (Caribbean, Brazilian, rock lobster) cost significantly less but have softer, spongier texture and less pronounced sweetness than cold-water varieties (Maine, Canadian). Solution: Understand what you’re purchasing. Warm-water tails are perfectly acceptable—they’re still delicious—but don’t compare them mentally to cold-water lobster. If the budget allows and you want the absolute best, seek out Maine or Canadian cold-water lobster tails. Specialty seafood markets and higher-end grocery stores typically label this distinction clearly.
Mistake #5: Not Thawing Completely Before Cooking Attempting to butterfly or cook partially frozen lobster tails results in uneven cooking—rubbery, overcooked exteriors paired with icy or undercooked centers. Solution: Plan ahead. Thaw frozen tails in the refrigerator overnight (8-24 hours). For same-day cooking, use the cold water bath method: submerge sealed tails in cold water, changing the water every 30 minutes until fully thawed (typically 30-60 minutes). Never cook from frozen—the results are consistently disappointing.
Mistake #6: Forgetting to Preheat the Broiler Adding lobster to a cold or inadequately heated broiler extends cooking time significantly and prevents proper caramelization, resulting in steamed-looking, pale meat rather than golden-roasted perfection. Solution: Preheat the broiler on high for a full 10 minutes before adding the lobster. The heating element should be glowing red-hot, and you should feel intense heat when you hold your hand near the oven opening (briefly—don’t burn yourself). This preheating ensures immediate searing upon contact.
Mistake #7: Drowning in Butter (Yes, It’s Possible) While butter is essential, using excessive amounts makes the dish greasy rather than luxurious and can cause the butter to burn and smoke in the oven, creating unpleasant flavors. Solution: Use 6 tablespoons (¾ stick) of butter for 4 tails—1.5 tablespoons per tail. This creates rich flavor and keeps the meat moist without overwhelming it. The butter should coat and enrich, not drown and dominate.
Mistake #8: Neglecting the Lemon Serving lobster without fresh lemon is like serving steak without salt—technically possible but fundamentally wrong. The bright acidity is non-negotiable for balancing the rich butter and sweet meat. Solution: Provide lemon wedges for squeezing tableside. The lemon should be added fresh by each diner just before eating, not in advance, as the acid begins to “cook” the meat slightly over time.
Storing Tips for the Recipe
While lobster is always best enjoyed immediately after cooking, proper storage techniques preserve quality when necessary:
Refrigerator Storage (1-2 Days Maximum):
- Lobster meat is highly perishable—consume within 1-2 days for best quality and safety
- Remove meat from the shell immediately after it cools to room temperature (leaving it in the shell accelerates deterioration)
- Store in an airtight container with any remaining garlic butter poured over the meat to prevent drying
- Place the container on the lowest shelf of the refrigerator (coldest zone, 32-38°F)
- Do not store at room temperature for more than 2 hours (1 hour if room temperature exceeds 90°F)
Freezer Storage (Not Recommended for Cooked Lobster): Freezing cooked lobster meat is technically safe but results in significant texture degradation—the delicate meat becomes spongy, watery, and loses the tender-sweet quality that makes lobster special. If you must freeze:
- Remove all meat from shells immediately
- Wrap tightly in plastic wrap, then aluminum foil
- Store in freezer-safe bags with as much air removed as possible
- Freeze for up to 2 months maximum
- Thaw overnight in the refrigerator, never at room temperature
- Use thawed, previously cooked lobster in soups, stews, or lobster rolls rather than serving as a centerpiece—the texture will not be suitable for standalone service
Raw Lobster Tail Storage: If you’ve purchased fresh (never frozen) raw lobster tails but aren’t cooking immediately:
- Store in the coldest part of the refrigerator (32-34°F ideal)
- Place on a bed of ice in a perforated pan set over another pan to catch melting water
- Cover loosely with damp paper towels (not plastic—lobster needs to breathe)
- Cook within 1-2 days of purchase for best quality
- Fresh lobster should smell clean and oceanic, never fishy or ammonia-like
Reheating Instructions (If Absolutely Necessary): Reheating cooked lobster is challenging because the lean meat easily becomes rubbery with even slight additional cooking:
- Steaming method (best): Place lobster meat in a steamer basket over boiling water for 3-4 minutes until just warmed through. This gentle, moist heat minimizes texture damage
- Butter bath method: Warm leftover garlic butter in a skillet over low heat, add lobster meat, cover, and warm for 2-3 minutes, spooning butter over the meat continuously
- Microwave (least recommended): Place meat in a microwave-safe container with a splash of water or butter, cover with a damp paper towel, heat at 30% power in 30-second intervals, checking frequently. Microwaving almost always produces rubbery texture
- Never oven-reheat: The dry heat of an oven guarantees rubbery, overcooked results
Best Practice Philosophy: The fundamental truth about lobster is that it’s meant to be cooked and consumed immediately. The textural deterioration that occurs within even hours of cooking is measurable and noticeable. For special occasions featuring lobster, plan timing so the tails emerge from the broiler within 10-15 minutes of serving time. This timing ensures you experience lobster at its absolute peak—tender, sweet, butter-drenched perfection that justifies every dollar spent.
Conclusion
The Garlic Butter Lobster Tail Recipe (Oven Broiled) demystifies luxury seafood preparation, proving that restaurant-quality results are achievable in just 20 minutes with proper butterflying technique, quality ingredients, and careful attention to broiling time. With 28-32g of premium protein, heart-healthy omega-3s, and decadent garlic butter enhancing naturally sweet lobster meat, this impressive yet accessible recipe transforms any meal into a celebration worth savoring.
Ready to master restaurant-quality lobster at home? Try this Lobster Tail Recipe this weekend and discover how surprisingly simple it is to create luxury worth celebrating! Share your beautiful results and personal touches in our review section below—we’d love to hear about your special occasions, creative variations, and the reactions around your table. Leave a comment on our blog with any questions or tips you discovered. Don’t forget to subscribe for more special-occasion recipes and gourmet techniques delivered to your inbox weekly. Your most impressive dinner yet is just one recipe away!
FAQs
Q: What’s the difference between cold-water and warm-water lobster tails, and does it matter for this Lobster Tail Recipe?
A: The distinction is significant and directly impacts both flavor and texture. Cold-water lobster tails (Maine, Canadian, sometimes marketed as North Atlantic) come from colder ocean environments where lobsters grow more slowly, resulting in denser, sweeter, more tender meat with superior flavor and firm texture. Warm-water lobster tails (Caribbean, Brazilian, rock lobster, sometimes labeled as simply “lobster tails”) grow in warmer waters where faster growth produces softer, slightly spongier meat with less pronounced sweetness. Cold-water tails cost approximately 40-60% more ($10-15 per tail vs. $6-9 for warm-water) but the difference is immediately noticeable—cold-water lobster has the characteristic sweet, delicate flavor and firm-yet-tender texture associated with high-end restaurants. Warm-water tails are perfectly acceptable for this recipe and still produce delicious results, but if you’re celebrating a truly special occasion or introducing someone to lobster for the first time, the premium for cold-water is worthwhile. Look for labels that specifically say “Maine,” “Canadian,” or “North Atlantic”—unlabeled “lobster tails” are almost always warm-water varieties.
Q: How do I know when the lobster tail is perfectly cooked and not overdone?
A: Precise doneness is crucial with lobster because the window between perfectly cooked and rubbery is frustratingly narrow—perhaps 2-3 minutes. Visual indicators: the meat should be completely opaque white with no translucent or glassy areas remaining, especially at the thickest part near where it was attached to the body. The meat should have pulled slightly away from the shell. Edges should show golden-brown caramelization spots. Touch test: gently press the meat with your finger or fork—it should feel firm but with slight give, similar to the fleshy part of your palm when you touch your thumb and index finger together. Temperature test (most reliable): insert an instant-read thermometer into the thickest part of the meat—it should read 135-140°F. At 135°F, the meat is perfectly cooked with optimal tenderness. Above 145°F, you’re entering rubbery territory. The meat will continue cooking from residual heat for 2-3 minutes after removing from the oven, so pulling it at 135°F is ideal—it will coast to about 140°F during resting.
Q: Can I prepare the lobster tails in advance and broil them just before serving?
A: Yes, with important caveats that maintain food safety and quality. You can butterfly the raw lobster tails, prepare the garlic butter, and have everything ready up to 4 hours in advance. Store the butterflied tails covered in the refrigerator and keep the garlic butter at room temperature (so it remains liquid for easy brushing). However, do not apply the butter until immediately before broiling—butter sitting on raw lobster meat for extended periods affects texture and can promote bacterial growth. Approximately 15 minutes before serving time, remove the tails from the refrigerator to take the chill off (cold tails take longer to cook and cook less evenly), brush with garlic butter, and proceed with broiling. This timing allows you to enjoy cocktails and appetizers with guests while the lobster takes its brief 8-10 minute cooking time, ensuring it arrives at the table at absolute peak perfection. Do not fully cook lobster tails in advance and reheat—reheated lobster loses the tender texture that justifies its cost.
Q: What should I do if I only have a conventional oven without a broiler function?
A: While the broiler’s intense direct heat from above creates ideal caramelization, you can adapt this Lobster Tail Recipe for a conventional oven with acceptable results. Preheat your oven to its maximum temperature (typically 500-550°F) and position the rack in the upper third of the oven (not directly under the heating element, but as close as possible). Prepare the lobster tails identically—butterfly, butter, and season. Increase cooking time to 12-15 minutes for 6-ounce tails (15-18 minutes for 8-ounce), checking for doneness at the 12-minute mark. The trade-off: conventional oven heat surrounds the food rather than hitting it from above, so you get less of the signature golden-brown caramelization on top and slightly different texture—still delicious but not quite the same restaurant-quality appearance. For maximum caramelization, consider finishing with a quick pass under the broiler for 1-2 minutes at the very end if your oven has a momentary broil setting, or use a kitchen torch to lightly caramelize the buttered surface just before serving.
Q: How do I choose the best lobster tails at the store, and what size should I buy?
A: Quality selection begins before you leave the store. For frozen lobster tails (most common): the shells should be bright red or reddish-brown without any white patches (freezer burn) or ice crystals (indicating thawing and refreezing, which damages texture). The package should feel solidly frozen with no ice crystals loose inside the bag. For “fresh” (previously frozen but thawed) tails at the seafood counter: they should smell clean and oceanic, never fishy, sour, or ammonia-like. The meat visible at the cut end should look opaque white or pale pink, not gray or yellowed. Ask when they were thawed—ideally no more than 24 hours prior. Regarding size: 6-8 ounce tails are the sweet spot for this recipe—large enough to be impressive and satisfying yet small enough to cook quickly and evenly under the broiler. Smaller 4-5 ounce tails cook in 6-8 minutes but offer less meat for the effort. Larger 10-12 ounce tails require 12-15 minutes and risk overcooking the exterior before the interior reaches temperature. For dinner parties, 6-8 ounces per person is generous; for surf and turf where steak is also served, 4-5 ounces per person is appropriate. Always purchase from reputable sources—specialty seafood markets or high-quality grocery stores with high seafood turnover ensure better quality than discount warehouses where seafood sits longer.
Print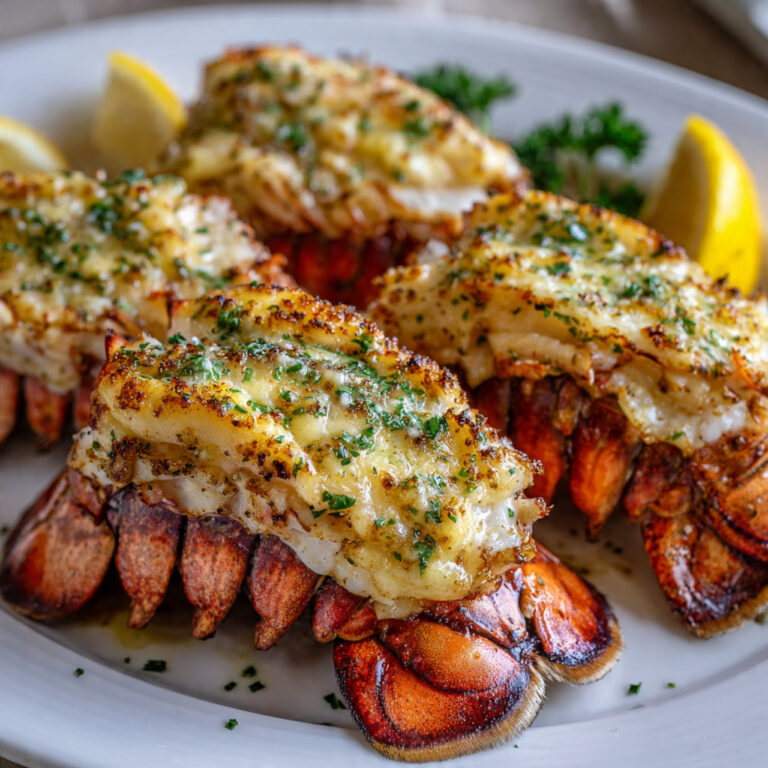
Garlic Butter Lobster Tail Recipe (Oven Broiled)
Master the art of cooking lobster at home with this foolproof Lobster Tail Recipe. Using a simple butterflying technique and high-heat broiling, you’ll achieve perfectly tender lobster meat with beautifully caramelized edges. The garlic butter infuses every bite with rich, savory flavor while fresh lemon brightens the dish. Elegant enough for special occasions yet surprisingly simple for any night of the week.
- Total Time: 18-20 minutes
- Yield: 4 servings
Ingredients
For the Lobster Tails:
- 4 lobster tails (6-8 ounces each), thawed if frozen
- 6 tbsp unsalted butter
- 4-5 garlic cloves, minced
- 1 tbsp fresh lemon juice
- 2 tbsp fresh parsley, finely chopped
- ¼ tsp smoked paprika
- Pinch of salt
- Freshly ground black pepper to taste
- Lemon wedges for serving
Optional Enhancements:
- 1 tbsp white wine
- Fresh thyme sprigs for garnish
- ¼ tsp Old Bay seasoning
- Pinch of crushed red pepper flakes
Instructions
- Preheat broiler: Position oven rack 6-8 inches from broiler element. Preheat broiler to high for 10 minutes. Line a baking sheet with foil.
- Butterfly tails: Using sharp kitchen shears, cut through the center of each lobster tail shell lengthwise from the wide end to the tail fin, stopping before cutting through the fin. Gently spread shell halves apart.
- Lift meat: Carefully separate meat from bottom shell while keeping it attached at the tail fin. Lift meat and lay it on top of the opened shell, creating a “butterfly” presentation.
- Make garlic butter: In a small saucepan, melt butter over low heat. Add minced garlic and cook gently for 30-60 seconds until fragrant but not browned. Remove from heat and stir in lemon juice, parsley, smoked paprika, salt, and pepper.
- Brush and broil: Place lobster tails on prepared baking sheet. Brush generously with half the garlic butter. Broil for 8-10 minutes (depending on size), brushing with remaining butter halfway through, until meat is opaque and edges are golden brown.
- Rest and serve: Remove from oven and let rest 2-3 minutes. Serve immediately with remaining butter from the pan, fresh lemon wedges, and additional parsley garnish.
Notes
- Thawing: Thaw frozen tails in refrigerator overnight (8-24 hours) or in cold water for 30-60 minutes. Never microwave to thaw.
- Don’t overcook: Lobster is done when meat is opaque and internal temperature reaches 135-140°F. It will continue cooking from residual heat.
- Cold-water vs warm-water: Cold-water tails (Maine, Canadian) have sweeter, firmer meat. Warm-water tails are more affordable but slightly softer.
- Butterflying is key: Properly lifting the meat ensures even cooking and beautiful presentation.
- Prep Time: 8 minutes
- Cook Time: 8-10 minutes
- Category: Main Course, Seafood
- Method: Broiling
- Cuisine: American, Seafood
- Diet: Gluten-Free, Keto-Friendly, Low-Carb