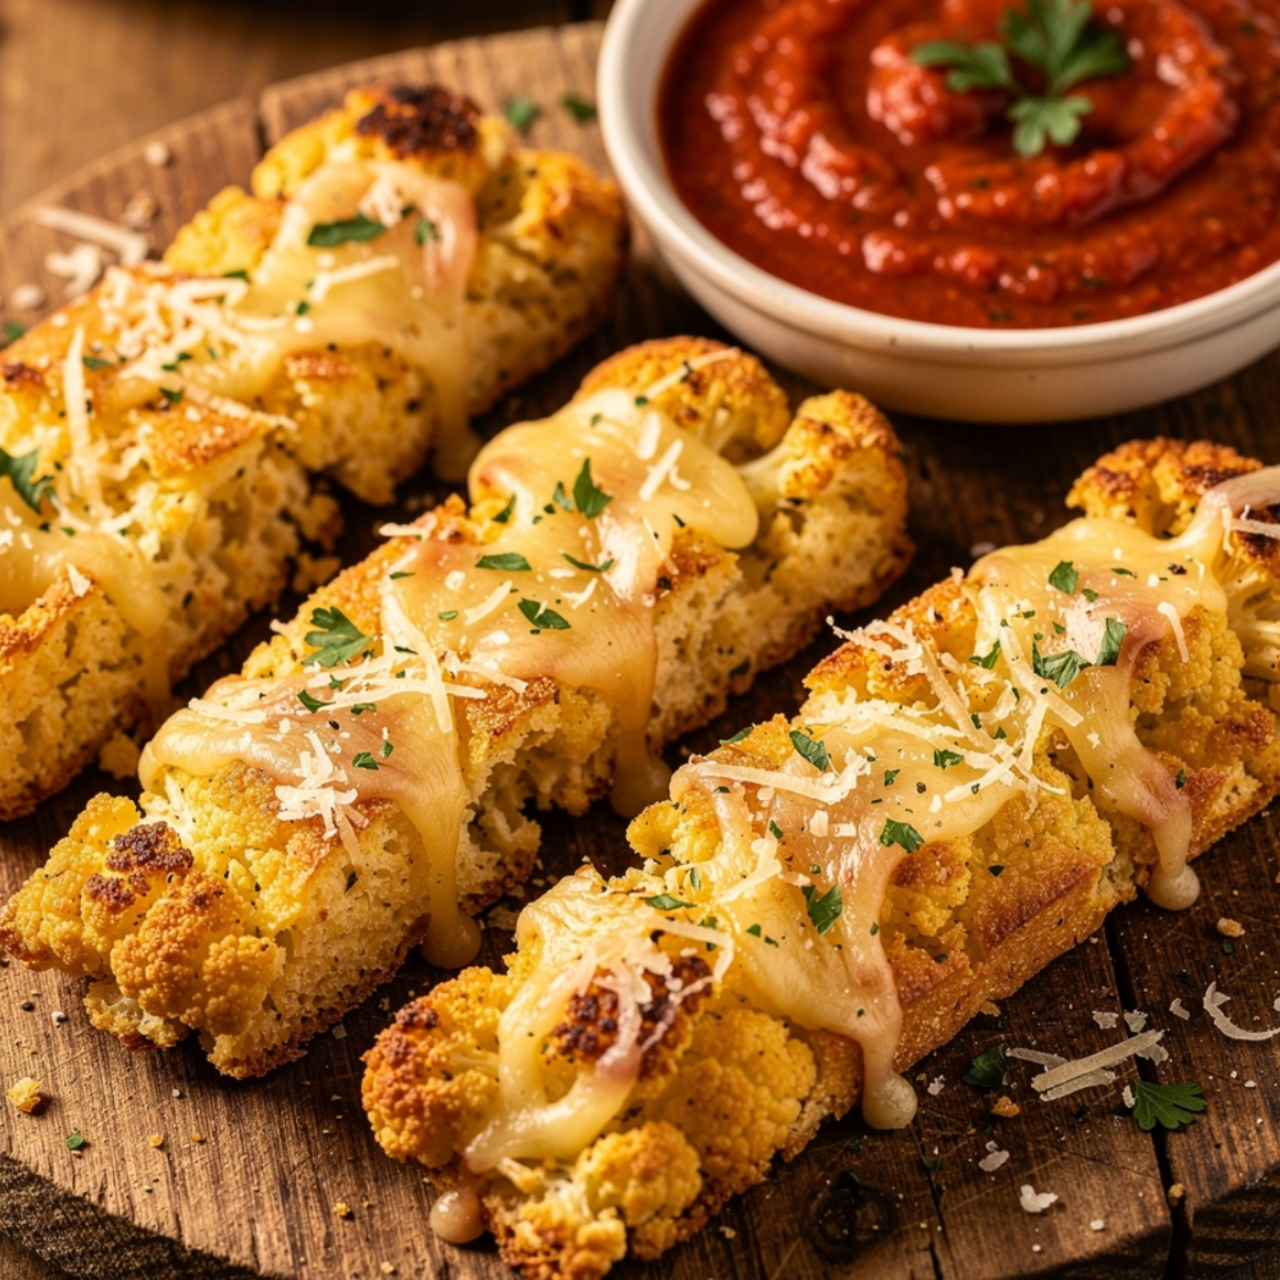
Cauliflower Garlic Breadsticks
Have you ever craved the comforting, buttery crunch of classic garlic bread but dreaded the heavy carb-induced slump that follows? What if you could enjoy a savory, golden-brown appetizer that packs a nutritional punch without sacrificing that iconic flavor? Our Cauliflower Garlic Breadsticks are here to change your kitchen game forever.
This recipe bridges the gap between indulgent comfort food and healthy eating. By transforming humble cauliflower into a sturdy, flavorful base, you can satisfy those late-night cravings while fueling your body with fiber and vitamins. It is the perfect low-carb solution for pizza nights, family gatherings, or a quick, guilt-free snack.
Table of Contents
Ingredients List
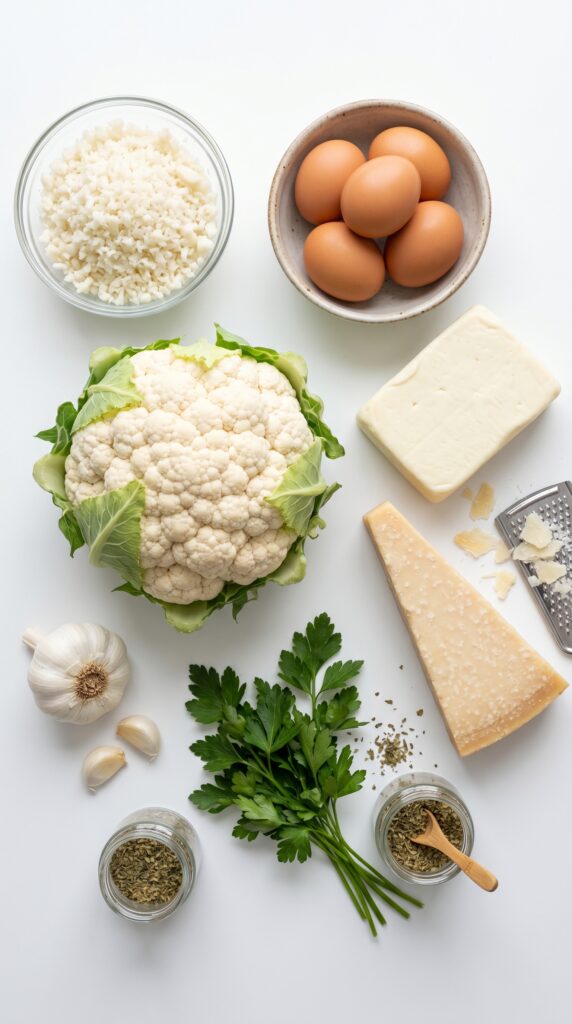
To create the perfect Cauliflower Garlic Breadsticks, quality ingredients are key. Here is what you will need for your kitchen adventure:
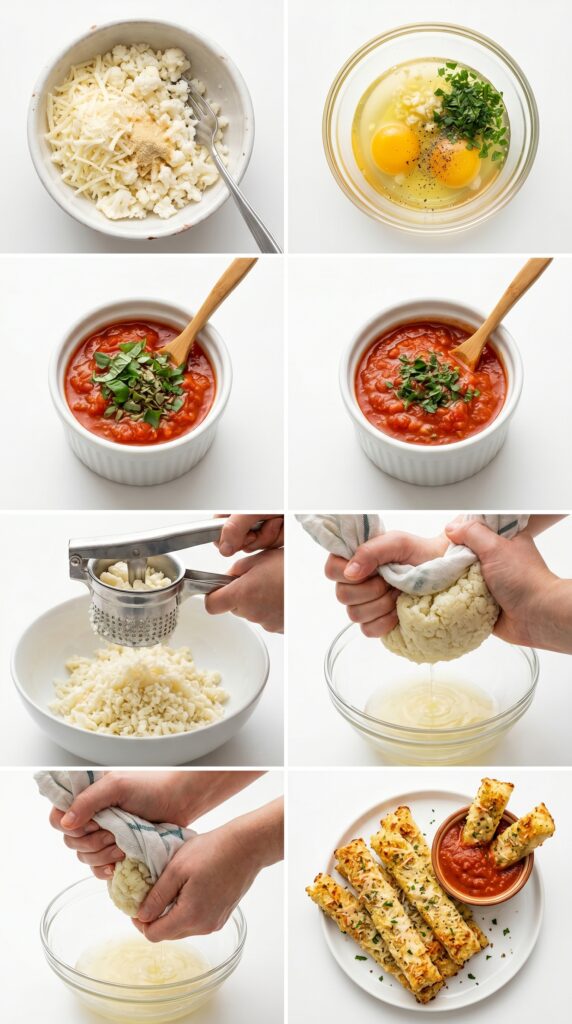
- Cauliflower: 1 medium head, riced (about 3-4 cups). Fresh is best, but frozen riced cauliflower works if thoroughly thawed and dried.
- Mozzarella Cheese: 1.5 cups, shredded. This acts as the “glue” for your breadsticks.
- Parmesan Cheese: 1/2 cup, freshly grated for that salty, umami kick.
- Egg: 1 large, whisked. This helps bind the crust together.
- Garlic: 3 cloves, minced fine. Fresh garlic provides a punchier flavor than powder.
- Seasonings: 1 teaspoon dried oregano, 1/2 teaspoon garlic powder, and a pinch of sea salt.
- Fresh Parsley: For a vibrant, herbaceous finish.
Substitution Tip: If you are dairy-free, replace the cheeses with a high-quality vegan mozzarella alternative or nutritional yeast for a nutty, cheesy flavor profile.
Timing
Efficiency is the hallmark of a great home cook. This recipe is designed to be streamlined for your busy schedule.
- Preparation Time: 15 minutes.
- Cooking Time: 30 minutes.
- Total Time: 45 minutes.
At just 45 minutes, this recipe takes 25% less time than a traditional yeast-risen dough, which often requires hours of proofing. It is the ideal “last-minute” appetizer that looks like it took hours of effort.
Step-by-Step Instructions
Step 1: Prep the Cauliflower
Preheat your oven to 400°F (200°C). Pulse your cauliflower florets in a food processor until they reach a rice-like consistency. Steam the cauliflower for 5 minutes, then let it cool. This is the most crucial step: use a clean kitchen towel to squeeze out every drop of moisture. Excess water is the enemy of crispy Cauliflower Garlic Breadsticks.
Step 2: Create the Dough
In a large mixing bowl, combine the dried riced cauliflower, shredded mozzarella, Parmesan, egg, minced garlic, and seasonings. Mix until a dough-like consistency forms. If it feels too wet, add a tablespoon of almond flour to help stabilize the mixture.
Step 3: Shape and Bake
Line a baking sheet with parchment paper. Press the dough into a rectangular shape, about 1/2 inch thick. Bake for 20-25 minutes until the edges are golden brown and the center is firm. The key is to ensure the crust is cooked through before adding toppings.
Step 4: The Finishing Touch
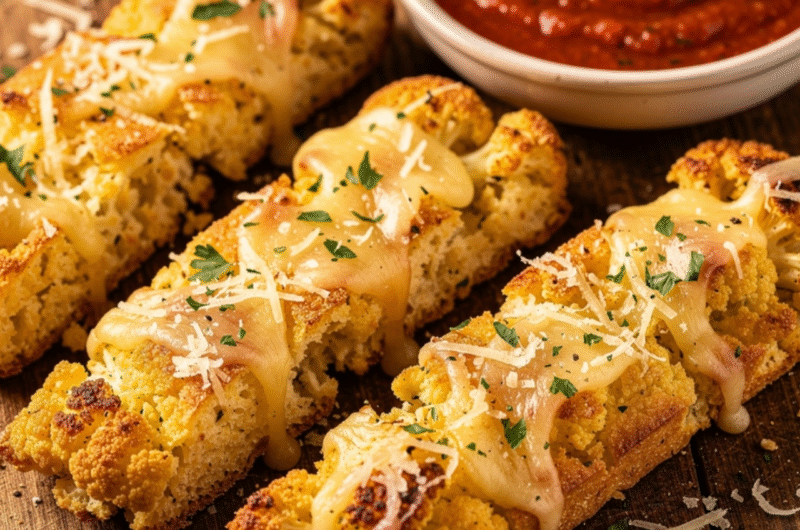
Remove from the oven, sprinkle with a little extra mozzarella, and broil for 2-3 minutes until bubbly. Top with fresh parsley and serve immediately. Cutting them into strips while they are still slightly warm ensures clean lines and perfect presentation.
Nutritional Information
Compared to traditional flour-based breadsticks, this version is a nutritional powerhouse. Each serving (approx. 2 breadsticks) contains roughly 120 calories, 8g of protein, and only 4g of net carbs.
Data suggests that swapping refined wheat for cruciferous vegetables like cauliflower increases your intake of Vitamin C and Vitamin K significantly. By reducing the glycemic load, you keep your energy levels steady throughout the day, avoiding the dreaded post-meal blood sugar spike.
Healthier Alternatives for the Recipe
Want to boost the nutritional profile further? Consider these simple swaps:
- Add Flaxseed: Mix in 1 tablespoon of ground flaxseed for an extra dose of Omega-3 fatty acids.
- Boost Protein: Use egg whites instead of a whole egg to reduce saturated fat content while maintaining the structure.
- Herb Infusion: Incorporate fresh basil or rosemary into the dough for added antioxidants and a complex flavor profile.
Serving Suggestions
These breadsticks are incredibly versatile. Serve them alongside a warm marinara dipping sauce for a classic experience. For a gourmet twist, pair them with a creamy pesto or a spicy garlic-infused olive oil.
They also make a fantastic side dish for a hearty minestrone soup or a fresh Mediterranean salad. If you are hosting a party, arrange them on a wooden board with a side of artichoke dip to wow your guests with your culinary ingenuity.
Common Mistakes to Avoid
- Skipping the Squeeze: Failing to remove moisture from the cauliflower will result in “soggy breadsticks.” Do not rush this step!
- Over-processing the Cauliflower: If you turn it into a puree, the texture will be mushy. Pulse it just until it resembles grains of rice.
- Using Low-Quality Cheese: Pre-shredded cheese often contains anti-caking agents that prevent proper melting. Grate your own mozzarella for the best results.
Storing Tips for the Recipe
If you have leftovers (which is rare!), store them in an airtight container in the refrigerator for up to 3 days. To restore the original crunch, avoid the microwave. Instead, reheat them in a toaster oven or air fryer at 350°F for about 5-7 minutes.
You can also prep the cauliflower “rice” ahead of time and keep it in the fridge for up to 2 days before baking, making your evening meal prep even faster.
Conclusion
Mastering these Cauliflower Garlic Breadsticks proves that healthy eating doesn’t have to be boring. With a crispy texture and savory garlic flavor, they are the ultimate crowd-pleaser for any dietary preference. By following these simple steps, you can enjoy a guilt-free treat that tastes like pure indulgence.
Are you ready to elevate your appetizer game? Try making this recipe this weekend and let us know your favorite dipping sauce in the comments below! Don’t forget to subscribe to our newsletter for more low-carb inspiration and weekly recipes delivered straight to your inbox.
Cauliflower Garlic Breadsticks
Course: SnacksCuisine: ItalianDifficulty: Easy8
servings15
minutes30
minutes120
kcalThese cauliflower garlic breadsticks deliver the buttery, golden-brown crunch of classic garlic bread without the carb overload. Riced cauliflower mixed with mozzarella, Parmesan, garlic, and herbs, baked until crispy, then broiled to bubbly perfection. Low-carb, gluten-free, and packed with flavor – perfect for pizza nights or guilt-free snacking!
Ingredients
1 medium head cauliflower, riced (about 3-4 cups)
1.5 cups shredded mozzarella cheese
1/2 cup freshly grated Parmesan cheese
1 large egg, whisked
3 cloves garlic, minced
1 teaspoon dried oregano
1/2 teaspoon garlic powder
Pinch of sea salt
Fresh parsley for garnish
Directions
- Step 1: Rice and Steam Cauliflower
- Pulse cauliflower florets in food processor until rice-like consistency. Steam 5 minutes, then cool completely. Place in clean kitchen towel and squeeze out ALL excess moisture (critical for crispiness).
- Step 2: Make Dough
- In large bowl, combine dried riced cauliflower, mozzarella, Parmesan, egg, minced garlic, oregano, garlic powder, and salt. Mix until dough forms. Add 1 tbsp almond flour if too wet.
- Step 3: Shape and Bake
- Preheat oven to 400°F (200°C). Line baking sheet with parchment paper. Press dough into 1/2-inch thick rectangle. Bake 20-25 minutes until edges are golden brown and center is firm.
- Step 4: Add Topping and Broil
- Remove from oven. Sprinkle with extra mozzarella. Broil 2-3 minutes until bubbly and golden.
- Step 5: Garnish and Serve
- Top with fresh parsley. Cut into strips. Serve immediately with marinara sauce.
Notes
- Squeeze cauliflower VERY dry: Excess moisture = soggy breadsticks. This step is non-negotiable.
Don’t over-process cauliflower: Pulse until rice-like – purée = mushy texture.
Grate your own cheese: Pre-shredded has anti-caking agents – won’t melt properly.
Storage: Refrigerate 3 days. Reheat in toaster oven or air fryer (not microwave). Prep cauliflower rice ahead up to 2 days.