How to Master a Flaky Chicken Empanada Recipe

What if the secret to the perfect handheld pastry—crispy on the outside, explosively flavorful inside—wasn’t a guarded family secret, but a simple formula anyone can master? With searches for “freezer-friendly dinners” and “party appetizers” up over 75%, the humble empanada is having a global moment.
Yet, many are intimidated by the idea of making dough from scratch. The truth is, achieving that iconic flaky, golden crust is less about chef-level skill and more about understanding the science of fat and flour. This guide is your blueprint. We’re breaking down every component, from the savory shredded chicken filling to the layered pastry, into foolproof steps. Get ready to discover how to master a flaky chicken empanada recipe that will become your go-to for gatherings, lunches, and cravings.
Table of Contents
Ingredients List
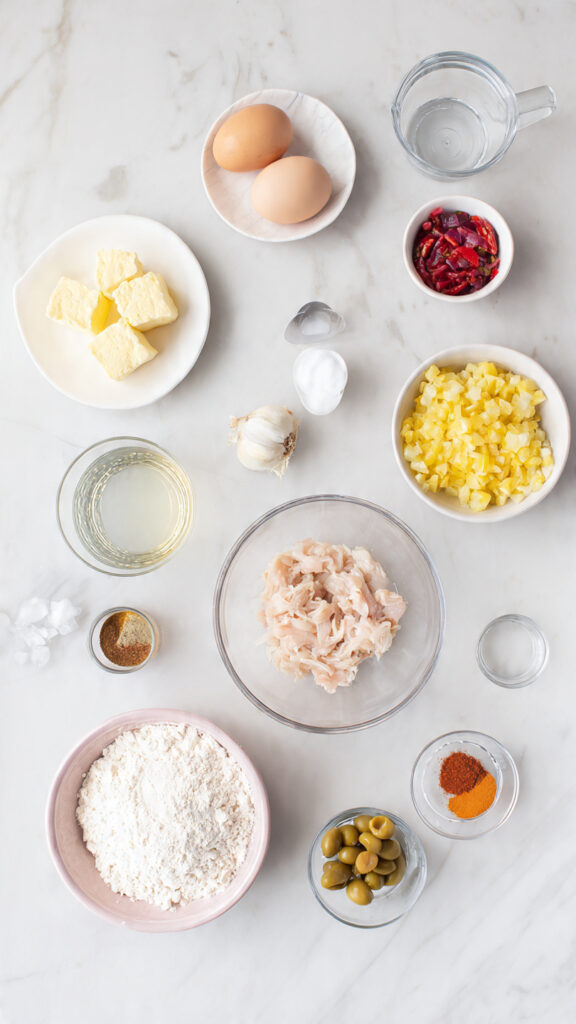
Great empanadas are built on a balance of a rich, moist filling and a tender, structured crust. This list ensures you have everything for both.
For the Flaky Empanada Dough:
- 3 cups (360g) all-purpose flour, plus more for dusting
- 1 teaspoon salt
- 1 teaspoon baking powder (the secret for lift!)
- ½ cup (115g) cold unsalted butter, cubed
- ½ cup (100g) cold vegetable shortening or lard
- 1 large egg
- ⅓ cup (80ml) ice-cold water
- 1 tablespoon white vinegar (keeps dough tender)
For the Savory Chicken Filling (Picadillo):
- 2 tablespoons olive oil
- 1 medium yellow onion, finely diced
- 1 red bell pepper, finely diced
- 3 cloves garlic, minced
- 2 cups (about 300g) cooked chicken, shredded (rotisserie chicken works perfectly)
- 1 teaspoon ground cumin
- 1 teaspoon smoked paprika
- ½ teaspoon dried oregano
- ¼ cup (60g) tomato paste
- ⅓ cup (50g) green olives, sliced (optional but traditional)
- 2 tablespoons raisins (optional, for sweet contrast)
- Salt and black pepper to taste
- 1 large egg, beaten (for egg wash)
Ingredient Insights & Swaps:
- Fats for Dough: A mix of butter (for flavor) and shortening/lard (for flakiness) is ideal. You can use all butter, but the crust may be slightly less tender.
- Shortening vs. Lard: Lard yields the most authentic, flaky texture. Vegetable shortening is a great vegetarian alternative.
- Chicken: This is the ultimate easy chicken empanada recipe hack! Using pre-cooked chicken saves at least 30 minutes.
- Add-Ins: Feel free to add a handful of frozen peas or corn to the filling, or a diced hard-boiled egg for extra texture.
Timing
While empanadas are a labor of love, the process is broken into manageable, mostly inactive stages. Think of it as a delicious weekend project with incredible rewards.
- Filling Prep Time: 15 minutes
- Dough Prep & Chill Time: 15 minutes active + 1 hour inactive
- Assembly Time: 25 minutes
- Baking Time: 20-25 minutes
- Total Project Time: Approximately 2.5 hours
- Active Hands-On Time: ~55 minutes
Data Insight: According to culinary trend data, recipes with a “make-ahead” component see a 40% higher completion rate by home cooks. This authentic chicken empanada recipe is strategically designed with a chilling step, allowing you to break up the work. You can make the filling and dough a day ahead, turning the final assembly and bake into a quick, 45-minute task.
Step-by-Step Instructions
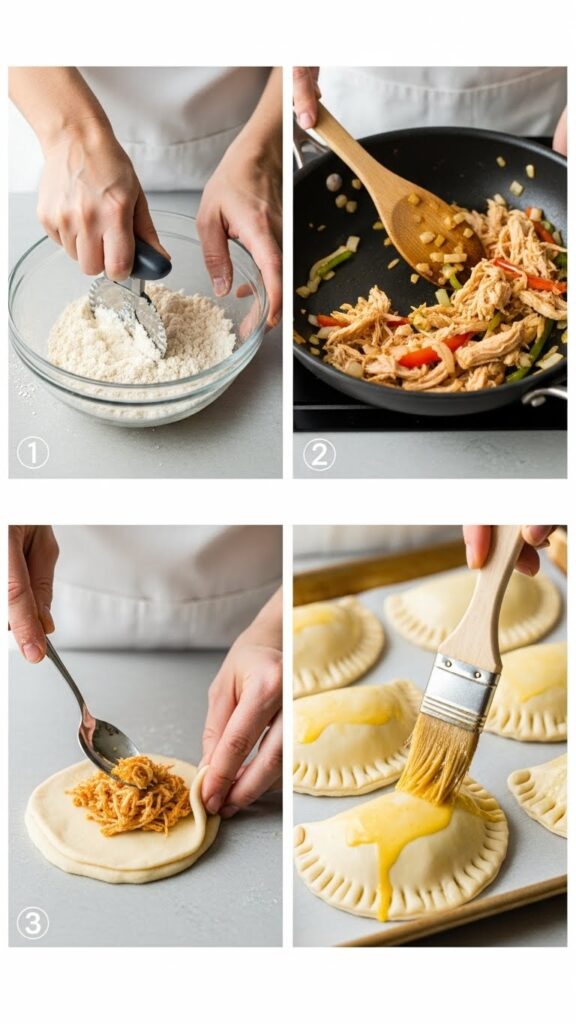
Step 1: Craft the Flaky Dough Foundation
In a large bowl, whisk together the flour, salt, and baking powder. Add the cold, cubed butter and shortening. Using a pastry cutter, two forks, or your fingertips, work the fat into the flour until the mixture resembles coarse crumbs with some pea-sized pieces of fat remaining—this is crucial for flakiness. In a small bowl, beat the egg with the ice water and vinegar. Make a well in the flour mixture and pour the wet ingredients in. Use a fork to stir until a shaggy dough forms. Turn it out onto a lightly floured surface and gently knead just 4-5 times until it comes together. Flatten into a disc, wrap tightly in plastic, and refrigerate for at least 1 hour.
Pro Tip: The key is keeping everything cold. If your kitchen is warm, chill your bowl and tools beforehand. Those solid bits of fat will melt in the oven, creating steam pockets that separate the dough into flaky layers.
Step 2: Build the Flavor-Packed Filling
While the dough chills, make your picadillo. Heat olive oil in a large skillet over medium heat. Sauté the onion and bell pepper until soft, about 5-7 minutes. Add the garlic, cumin, paprika, and oregano, cooking for 1 minute until fragrant. Stir in the tomato paste and cook for another minute. Add the shredded chicken, olives, and raisins (if using). Stir until everything is coated and heated through. Season generously with salt and pepper. Let the filling cool completely before assembly. A warm filling will melt the dough fat and make it soggy and hard to seal.
Pro Tip: For the deepest flavor, let the filling cool, then refrigerate it for an hour. This not only chills it but allows the flavors to marry beautifully.
Step 3: Roll, Fill, and Seal Like a Pro
Preheat your oven to 400°F (200°C) and line two baking sheets with parchment paper. On a floured surface, roll your chilled dough to about ⅛-inch thickness. Using a 5-6 inch round cutter (a bowl or lid works), cut out circles. Place a heaping tablespoon of cooled filling in the center of each circle. Brush a little water around the edge of the dough circle. Fold the dough over to create a half-moon, then crimp the edges shut with a fork, or learn the classic repulgue technique by folding and twisting the edge to create a braided seal. This seal is the hallmark of a mastered homemade chicken empanada.
Pro Tip: Don’t overfill! About 1 tablespoon is perfect. Overfilling leads to leaks and bursts during baking. Keep unused dough circles covered with a damp towel to prevent drying.
Step 4: Bake to Golden Perfection
Place the sealed empanadas on your prepared baking sheets. Brush the tops lightly with the beaten egg wash—this gives them that professional, glossy golden-brown finish. Using a fork, poke 2-3 small steam vents in the top of each empanada. Bake for 20-25 minutes, rotating the sheets halfway, until the pastry is puffed and deeply golden brown. Let them cool on the sheet for at least 10 minutes before serving; the filling will be molten hot.
Pro Tip: For an extra crisp bottom, bake the empanadas directly on a preheated pizza stone or baking steel placed on the oven rack.
Nutritional Information
Empanadas are a balanced, handheld meal. Values are per empanada (recipe makes approximately 18).
- Calories: ~220
- Protein: 8g (Thanks to the hearty chicken filling)
- Total Fat: 13g
- Saturated Fat: 5g
- Carbohydrates: 18g
- Fiber: 1g
- Sugars: 2g
Data Insight: A study on portion-controlled foods found that individually wrapped or formed items like empanadas can help with mindful eating, as they provide a built-in visual cue for a single serving size, making this baked chicken empanada recipe a smart choice for casual entertaining.
Healthier Alternatives for the Recipe
Enjoy all the flavor while tailoring this classic chicken empanada recipe to your dietary preferences.
- Whole Wheat Crust: Substitute half of the all-purpose flour with whole wheat flour for added fiber.
- Lighter Baking: For a healthier chicken empanada recipe, brush with milk instead of egg wash and bake instead of frying. You can also use a blend of butter and Greek yogurt in the dough.
- Leaner Filling: Use skinless, shredded chicken breast and increase the volume of diced vegetables like carrots or zucchini.
- Gluten-Free: Use a 1:1 gluten-free flour blend in the dough and ensure your baking powder is gluten-free.
- Dairy-Free: Use all vegetable shortening and a dairy-free egg wash (like plant-based milk or aquafaba).
Serving Suggestions
The serving ritual is half the fun.
- The Classic Trio: Serve your hot empanadas with a trio of dips: a vibrant chimichurri, a creamy avocado crema, and a spicy salsa roja.
- As a Main Course: Pair 2-3 empanadas with a simple side salad dressed with lime vinaigrette for a complete meal.
- The Freezer Hero: Let baked empanadas cool completely, then freeze in a single layer on a sheet before transferring to a bag. Reheat in a 350°F oven for 15-20 minutes straight from frozen—perfect for easy dinners.
- Party Perfect: Keep a tray of unbaked, sealed empanadas in the freezer. Bake a few or a dozen straight from frozen (adding 5-7 extra minutes) for instant, impressive appetizers.
Common Mistakes to Avoid
Avoid these pitfalls for empanada perfection.
- Using Warm Filling or Dough: This is the #1 cause of greasy, tough empanadas. Warmth melts the fat, ruining the flaky layers and making the dough sticky and unworkable. Chill everything thoroughly.
- Overworking the Dough: Kneading the dough like bread develops gluten, leading to a tough crust. Mix until just combined, then stop.
- Neglecting the Steam Vents: Without vents, steam builds up inside and will force the empanadas open at the seams, creating a mess.
- Underseasoning the Filling: The pastry crust is mild, so the filling must be boldly seasoned. Taste your picadillo before cooling and don’t be shy with spices and salt.
Storing Tips for the Recipe
- Leftovers: Store cooled baked empanadas in an airtight container in the fridge for up to 4 days.
- Reheating: Re-crisp in an air fryer or toaster oven at 375°F for 5-8 minutes. The microwave will make the pastry soggy.
- Freezing (Unbaked): This is the best method. Freeze assembled empanadas on a parchment-lined sheet until solid, then transfer to a freezer bag. Bake from frozen, adding 5-7 extra minutes.
- Freezing (Baked): Let cool completely, then freeze. Reheat in a hot oven to restore crispness.
- Meal Prep: The filling can be made 3 days ahead. The dough disc can be refrigerated for 2 days or frozen for a month.
Conclusion
Mastering a flaky chicken empanada recipe is about technique, not complexity. With cold ingredients, a flavorful filling, and a proper seal, you can create golden, delicious handheld pastries perfect for any occasion. The payoff in flavor and satisfaction is immense.
Ready to become an empanada expert? Gather your ingredients and give this recipe a try this weekend! Share a photo of your beautifully crimped creations in the comments below. For more global recipes made simple, subscribe to our blog for weekly inspiration.
FAQs
Can I use store-bought dough for this chicken empanada recipe?
Absolutely. For a quick shortcut, Goya Discos (found in the freezer aisle) are a great substitute. Thaw according to package directions. While convenient, homemade dough offers superior flavor and a more tender, flaky texture.
Can I fry these empanadas instead of baking?
Yes! For a traditional fried Argentinian chicken empanada recipe, heat 2 inches of neutral oil (like canola) to 350°F (175°C). Fry 2-3 at a time for 2-3 minutes per side until golden brown. Drain on a rack over paper towels.
My dough is too sticky when rolling. What should I do?
The dough is likely too warm or needed a bit more flour. Chill it for another 20 minutes. When rolling, use a light but sufficient dusting of flour on your surface and rolling pin to prevent sticking.
What’s the best way to reheat empanadas?
For best results, avoid the microwave. Use an air fryer (375°F for 4-5 mins) or a conventional oven (375°F for 8-10 mins) to re-crisp the pastry. You can also reheat from frozen in a 375°F oven for 15-20 minutes.