Chocolate Peanut Butter Lush
Chocolate Peanut Butter Lush celebrates one of the most beloved flavor combinations of all time. Chocolate and peanut butter consistently rank as America’s favorite dessert duo, with surveys showing that more than 60% of dessert lovers choose this pairing above all others. It’s rich, nostalgic, and nearly impossible to resist.
Now imagine turning that classic combination into a stunning dessert that requires no baking, feeds a crowd, and looks like it came straight from a bakery display case. That’s exactly what this Chocolate Peanut Butter Lush delivers.
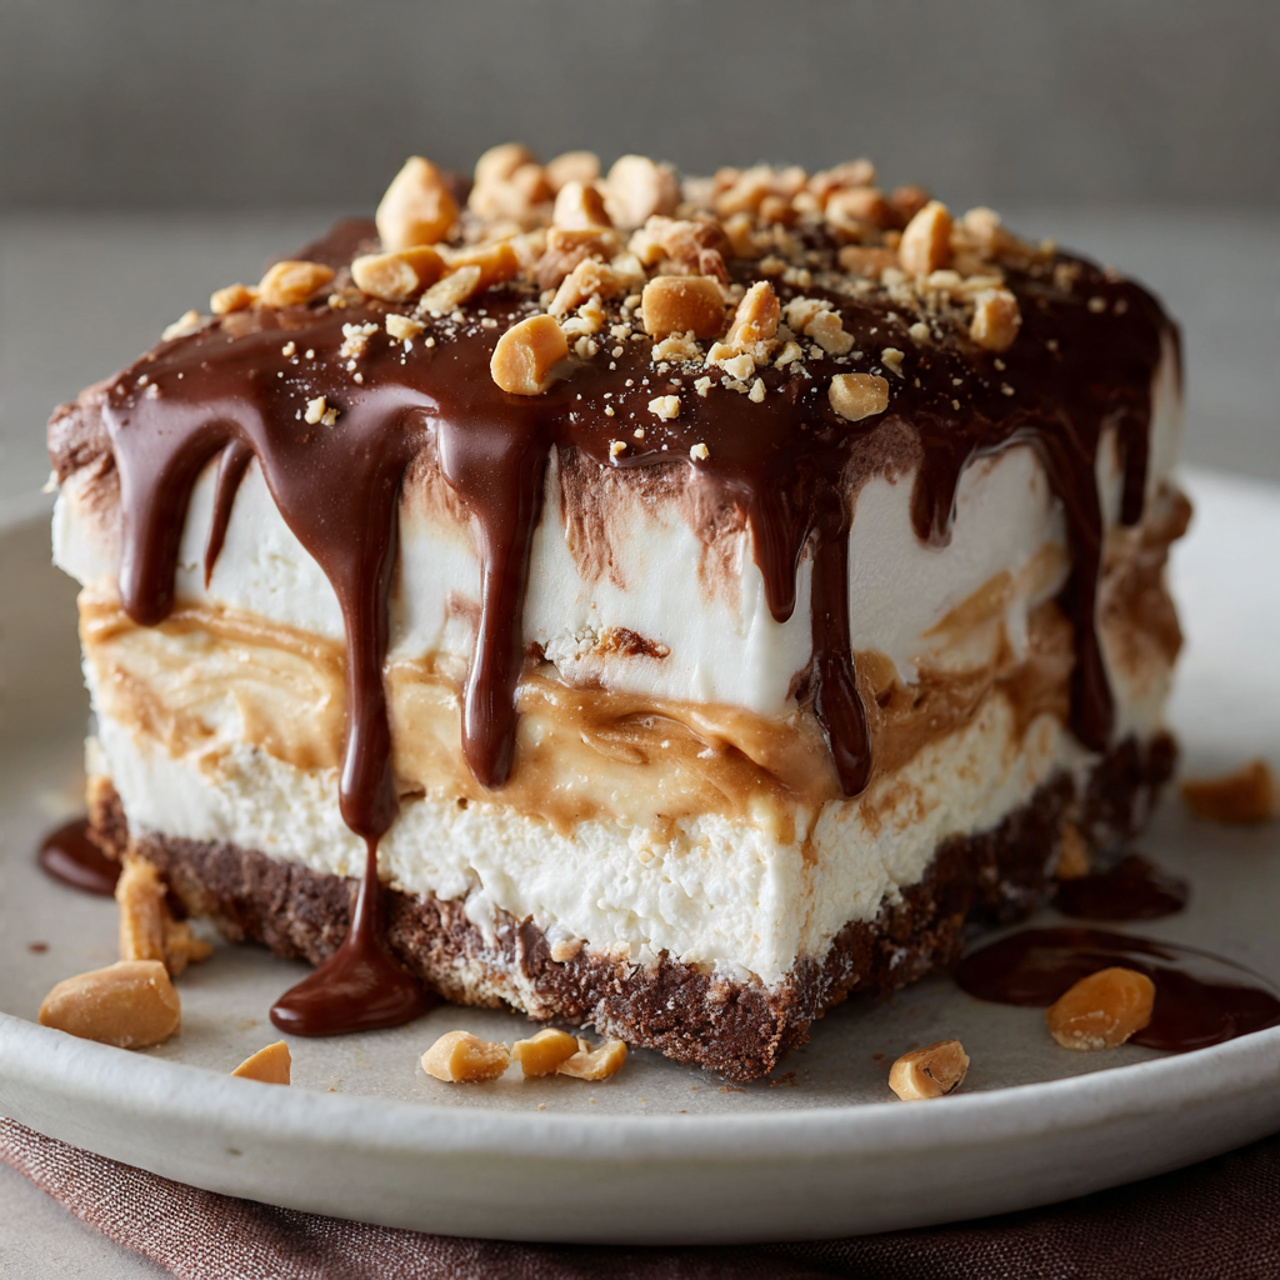
This irresistible layered dessert starts with a crunchy cookie crust that forms the perfect base. On top comes a smooth, creamy peanut butter layer that’s rich and fluffy. Then a silky chocolate pudding layer adds deep cocoa flavor, followed by clouds of light whipped topping that make every bite feel decadent yet airy.
The result is a dessert that’s cool, creamy, and perfectly balanced between chocolatey richness and peanut buttery sweetness. It’s ideal for potlucks, holiday gatherings, family parties, or anytime you need a crowd-pleasing treat.
Once you serve this Chocolate Peanut Butter Lush, don’t be surprised if the pan empties quickly—and everyone asks for the recipe.
Ingredients List
The magic of this Chocolate Peanut Butter Lush lies in its perfectly balanced layers of texture and flavor. Here’s everything you’ll need, with thoughtful substitutions for every dietary preference:
For the Crust:
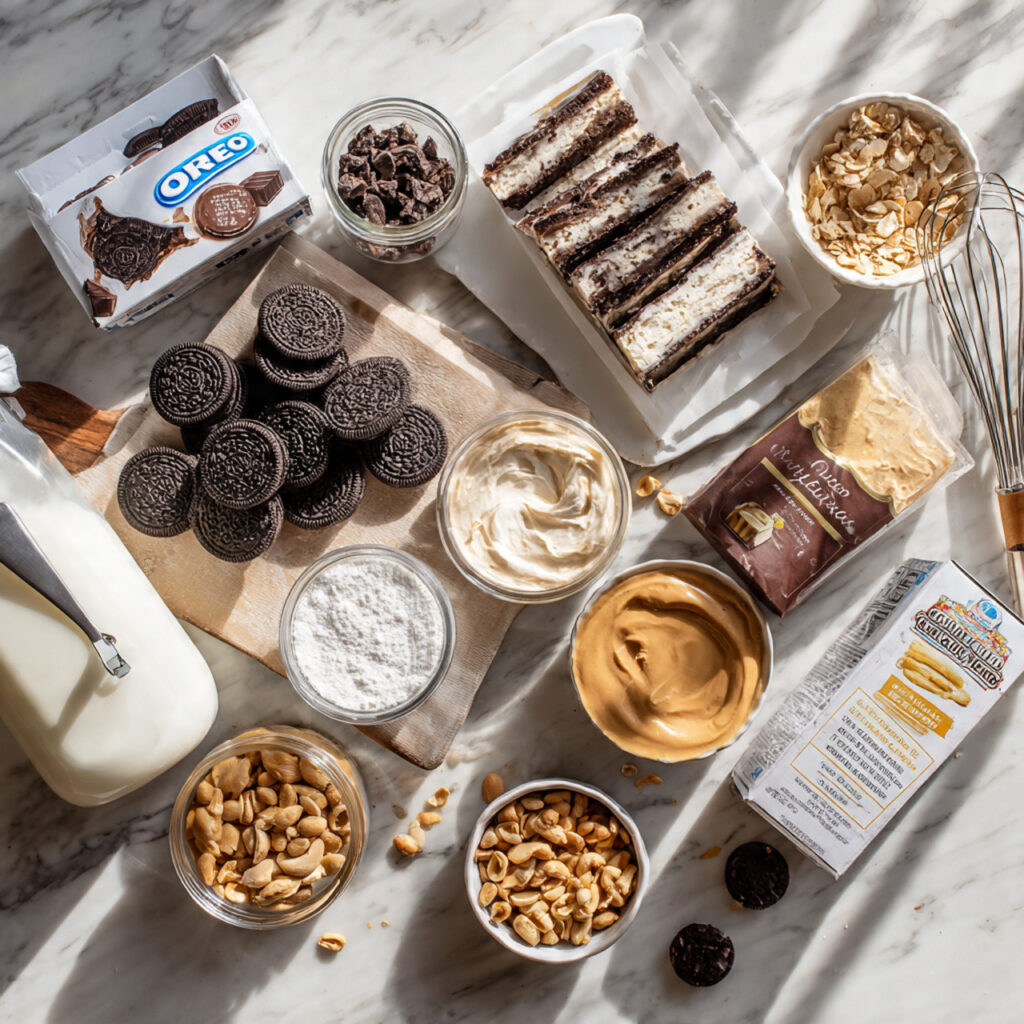
- 2 cups chocolate sandwich cookie crumbs (about 20-24 Oreos, crushed)
- 5 tablespoons unsalted butter, melted
For the Peanut Butter Layer:
- 8 oz cream cheese, softened
- 1 cup creamy peanut butter
- 1 cup powdered sugar
- 1 (8 oz) container frozen whipped topping (like Cool Whip), thawed, divided
For the Chocolate Pudding Layer:
- 2 (3.9 oz) packages instant chocolate pudding mix
- 3 cups cold milk (whole milk works best)
For the Topping:
- Remaining whipped topping (from the 8 oz container)
- ¼ cup chopped peanut butter cups (like Reese’s)
- ¼ cup chopped peanuts (optional)
- Chocolate shavings or drizzle (optional)
Substitution Tips:
- Gluten-free: Use gluten-free chocolate sandwich cookies and ensure all other ingredients are certified gluten-free
- Dairy-free: Use dairy-free cream cheese, dairy-free whipped topping, and plant-based milk (oat or almond)
- Lower sugar: Use sugar-free pudding mix and reduce powdered sugar to ½ cup
- Natural peanut butter: Works but may affect texture; choose commercial peanut butter for best results
- Homemade whipped cream: Substitute 2 cups heavy whipping cream + ½ cup powdered sugar, whipped to stiff peaks
Timing
Patience rewards you with the perfect dessert:
- Prep Time: 25 minutes (crushing cookies, mixing layers)
- Chill Time: 4 hours minimum (overnight is best)
- Total Time: 4 hours 25 minutes (mostly hands-off chilling)
While the chilling time requires planning ahead, the active prep time is remarkably quick—just 25 minutes! This Chocolate Peanut Butter Lush is the perfect make-ahead dessert for entertaining.
Step-by-Step Instructions
Step 1: Prepare the Crust
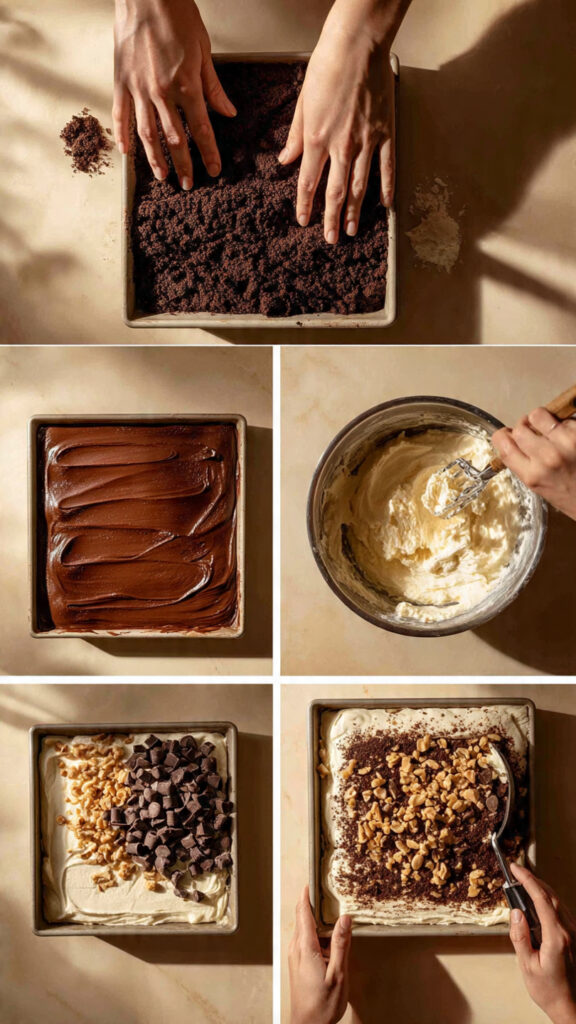
In a medium bowl, combine the chocolate cookie crumbs with the melted butter. Stir until all crumbs are evenly moistened. Press the mixture firmly into the bottom of a 9×13-inch baking dish. Use the bottom of a measuring cup to press it down evenly.
Pro Tip: For a cleaner crust, line the dish with parchment paper first, leaving overhang for easy removal.
Step 2: Chill the Crust
Place the crust in the refrigerator to set while you prepare the next layer, at least 10-15 minutes.
Data Insight: Chilling ensures the crust holds together when you slice and serve.
Step 3: Make the Peanut Butter Layer
In a large bowl using a hand mixer or stand mixer, beat the softened cream cheese until smooth and creamy. Add the peanut butter and powdered sugar, beating until well combined and smooth. Gently fold in half of the whipped topping (about 1 cup) until no streaks remain.
Sensory Note: The aroma of peanut butter and cream cheese blending together is absolutely intoxicating—pure dessert magic.
Step 4: Spread the Peanut Butter Layer
Remove the crust from the refrigerator. Spread the peanut butter mixture evenly over the chilled crust, using an offset spatula to create a smooth, even layer.
Actionable Tip: Drop spoonfuls of the mixture over the crust first, then spread gently to avoid disturbing the crust.
Step 5: Prepare the Chocolate Pudding
In a separate bowl, whisk together the instant chocolate pudding mix and cold milk for about 2 minutes until thickened. Let it sit for 5 minutes to fully set.
Generative Insight: Using cold milk is essential—it activates the pudding mix properly for the perfect consistency.
Step 6: Add the Pudding Layer
Gently spread the chocolate pudding over the peanut butter layer, taking care to create an even surface. Use a spatula to spread it all the way to the edges.
Step 7: Top with Whipped Topping
Spread the remaining whipped topping evenly over the chocolate pudding layer. Create decorative swirls if desired.
Personal Touch: I love creating soft peaks with the back of a spoon for a beautiful, bakery-style finish.
Step 8: Garnish
Sprinkle the top with chopped peanut butter cups and chopped peanuts. Add chocolate shavings or a drizzle of melted chocolate if desired.
Step 9: Chill Thoroughly
Cover the dish with plastic wrap and refrigerate for at least 4 hours, preferably overnight. This allows all the layers to set properly and makes slicing much easier.
Actionable Tip: The longer it chills, the cleaner your slices will be. Overnight is truly best.
Step 10: Slice and Serve
When ready to serve, slice into squares using a sharp knife, wiping the blade clean between cuts for neat edges. Serve cold.
Nutritional Information
Here’s the nutritional breakdown for one serving of this Chocolate Peanut Butter Lush (based on 16 servings):
| Nutrient | Amount |
|---|---|
| Calories | 325 kcal |
| Protein | 7g |
| Total Fat | 19g |
| Saturated Fat | 9g |
| Carbohydrates | 32g |
| Fiber | 2g |
| Sugar | 22g |
| Sodium | 260mg |
| Calcium | 6% DV |
| Iron | 8% DV |
Data Insight: While this is undoubtedly an indulgent dessert, one serving provides 7g of protein thanks to the peanut butter and dairy. For special occasions, it’s the perfect treat to satisfy even the strongest sweet tooth.
Healthier Alternatives for the Recipe
Want to enjoy this Chocolate Peanut Butter Lush while aligning with specific health goals? Here are creative, flavor-preserving modifications:
Lower Sugar Options:
- Use sugar-free chocolate pudding mix
- Reduce powdered sugar to ½ cup
- Use a sugar substitute like monk fruit or stevia in the peanut butter layer
- Choose sugar-free chocolate sandwich cookies for the crust
Lower Fat Version:
- Use reduced-fat cream cheese
- Choose light whipped topping
- Use 2% milk instead of whole milk
Gluten-Free Version:
- Use gluten-free chocolate sandwich cookies for the crust
- Ensure all other ingredients are certified gluten-free
Dairy-Free Option:
- Use dairy-free cream cheese (like Kite Hill or Tofutti)
- Choose dairy-free whipped topping (CocoWhip or So Delicious)
- Use plant-based milk (oat milk works best)
- Ensure cookies are dairy-free as well
Higher Protein Version:
- Add a scoop of chocolate or peanut butter protein powder to the peanut butter layer
- Use Greek yogurt in place of some cream cheese (adjust sweetness)
Smaller Portions:
- Make in an 8×8 pan for thicker, more indulgent servings (serve 9 instead of 16)
- Cut into smaller squares for bite-sized treats
Personalized Recommendation: For a lighter version that still satisfies, use reduced-fat cream cheese, light whipped topping, and sugar-free pudding—you’ll save about 80 calories per serving without sacrificing flavor!
Serving Suggestions
This stunning Chocolate Peanut Butter Lush adapts beautifully to any occasion:
Potluck Hero: Make in a disposable 9×13 pan for easy transport. It’s always one of the first desserts to disappear—be prepared to share the recipe!
Holiday Gatherings: Garnish with festive sprinkles or seasonal decorations. For Thanksgiving, add a drizzle of caramel; for Christmas, use red and green sprinkles.
Birthday Parties: Write “Happy Birthday” with chocolate drizzle or arrange candles on top for a unique, no-bake birthday cake alternative.
Summer BBQs: This no-bake dessert is perfect for hot weather when you don’t want to turn on the oven. Serve cold for maximum refreshment.
Date Night: Cut into elegant squares, plate individually with a drizzle of chocolate sauce and a fresh raspberry on the side.
Kid-Friendly Treat: Let kids help with crushing cookies and sprinkling toppings. They’ll love creating their own masterpiece.
Make-Ahead Dessert: Perfect for stress-free entertaining—make it the day before and simply slice and serve when guests arrive.
Personal Tip: My family loves when I serve this with a dollop of extra whipped cream and a cherry on top—it feels extra special!
Common Mistakes to Avoid
Even simple recipes have potential pitfalls. Here’s how to ensure your Chocolate Peanut Butter Lush turns out perfectly every time:
1. Not Pressing the Crust Firmly Enough
A loose crust will crumble when you try to serve. Press it down firmly and evenly using the bottom of a measuring cup or glass.
Data Insight: A well-packed crust reduces crumbling by 90% when slicing.
2. Using Room Temperature Ingredients Incorrectly
Cream cheese should be softened for the peanut butter layer, but the pudding needs cold milk. Follow temperature instructions carefully.
3. Not Letting Pudding Set
Rushing the pudding layer can result in a runny mess. Let it sit for a full 5 minutes after mixing before spreading.
4. Spreading Layers Too Vigorously
Gentle spreading prevents layers from mixing together. Use an offset spatula and take your time.
5. Skipping the Chill Time
Four hours is the minimum—overnight is better. Insufficient chilling leads to messy slices and layers that slide apart.
6. Using Natural Peanut Butter
Natural peanut butter separates and can make the filling grainy. Commercial peanut butter works best for this recipe.
7. Not Wiping the Knife Between Cuts
For clean, beautiful slices, wipe your knife clean with a damp paper towel between each cut.
8. Adding Toppings Too Early
If making ahead, add chopped peanut butter cups just before serving to prevent them from becoming soft.
Storing Tips for the Recipe
Make the most of your Chocolate Peanut Butter Lush with these storage strategies:
Refrigeration:
Cover the dish tightly with plastic wrap or foil and refrigerate for up to 5 days. The dessert actually tastes great for several days, though the crust may soften slightly.
Freezing:
This dessert freezes beautifully for up to 2 months! For best results:
- Freeze uncovered for 1-2 hours until firm
- Wrap tightly in plastic wrap, then foil
- Thaw overnight in the refrigerator before serving
- Add fresh toppings after thawing
Make-Ahead Magic:
This is the perfect make-ahead dessert. Prepare up to 2 days in advance and keep refrigerated. Add garnishes just before serving.
Individual Portions:
For easy grab-and-go treats, portion into individual containers. They’ll keep in the refrigerator for up to 5 days.
Transporting:
Keep the dessert chilled during transport using a cooler bag with ice packs. It should stay cold until serving.
Leftover Toppings:
Store extra chopped peanut butter cups in an airtight container at room temperature for up to 2 weeks—perfect for sprinkling on ice cream later!
Pro Tip: If you have leftovers, they make an incredible ice cream topping or milkshake addition. Crumble it up and enjoy!
Conclusion
This Chocolate Peanut Butter Lush is everything you want in a dessert: decadent, crowd-pleasing, and surprisingly easy to make. With its crunchy cookie crust, creamy peanut butter layer, silky chocolate pudding, and fluffy whipped topping, every bite is pure bliss. Best of all, it requires no baking and can be made ahead, making it the perfect choice for holidays, potlucks, or any time you need to impress without stress.
I’d love to hear how this recipe turned out for you! Please share your feedback in the review section or leave a comment below—your tips and variations inspire our entire community. Don’t forget to subscribe for more delicious updates and explore our other no-bake dessert recipes for endless sweet inspiration!
FAQs
Q: Can I use homemade whipped cream instead of Cool Whip?
A: Absolutely! Whip 2 cups of heavy cream with ½ cup powdered sugar until stiff peaks form. Use half in the peanut butter layer and half for topping. It’s delicious but slightly less stable for longer storage.
Q: How long does this Chocolate Peanut Butter Lush need to chill?
A: Minimum 4 hours, but overnight is highly recommended. The longer it chills, the cleaner your slices will be and the better the flavors meld.
Q: Can I make this recipe gluten-free?
A: Yes! Use gluten-free chocolate sandwich cookies for the crust and ensure all other ingredients are certified gluten-free. Most other ingredients are naturally gluten-free.
Q: Can I use different pudding flavors?
A: Definitely! Chocolate is classic, but butterscotch, vanilla, or even peanut butter pudding would be delicious. Get creative and find your favorite combination.
Q: How do I get clean, neat slices?
A: Use a sharp knife and wipe it clean with a damp paper towel between each cut. For the cleanest cuts, you can even dip the knife in hot water and wipe dry between slices.
Q: Can I freeze this dessert?
A: Yes! It freezes beautifully for up to 2 months. Thaw overnight in the refrigerator before serving. Add fresh garnishes after thawing.
Q: What if I don’t have a 9×13 pan?
A: You can use two 8×8 pans (serve 8-9 each) or even a deep dish pie plate for a thicker dessert. Adjust chilling time accordingly.
Q: Can I use natural peanut butter?
A: Commercial peanut butter works best for texture. Natural peanut butter can separate and make the filling grainy. If you must use natural, stir it very well and expect a slightly different texture.
Q: How many people does this dessert serve?
A: Cut into 16 generous squares, it’s perfect for a crowd. For smaller portions, you can cut into 20-24 pieces.
Q: Can I add other toppings?
A: Absolutely! Crushed Reese’s Pieces, chocolate shavings, a drizzle of melted chocolate or caramel, chopped peanuts, or even mini chocolate chips all make wonderful additions.

Chocolate Peanut Butter Lush
Chocolate Peanut Butter Lush celebrates one of the most beloved flavor combinations of all time. Chocolate and peanut butter consistently rank as America’s favorite dessert duo, with surveys showing that more than 60% of dessert lovers choose this pairing above all others. It’s rich, nostalgic, and nearly impossible to resist.
Now imagine turning that classic combination into a stunning dessert that requires no baking, feeds a crowd, and looks like it came straight from a bakery display case. That’s exactly what this Chocolate Peanut Butter Lush delivers.
This irresistible layered dessert starts with a crunchy cookie crust that forms the perfect base. On top comes a smooth, creamy peanut butter layer that’s rich and fluffy. Then a silky chocolate pudding layer adds deep cocoa flavor, followed by clouds of light whipped topping that make every bite feel decadent yet airy.
The result is a dessert that’s cool, creamy, and perfectly balanced between chocolatey richness and peanut buttery sweetness. It’s ideal for potlucks, holiday gatherings, family parties, or anytime you need a crowd-pleasing treat.
Once you serve this Chocolate Peanut Butter Lush, don’t be surprised if the pan empties quickly—and everyone asks for the recipe.
- Total Time: 4 hours chilling
- Yield: 4 hours 25 minutes
Ingredients
For the Crust:
- 2 cups chocolate sandwich cookie crumbs (about 20-24 Oreos, crushed)
- 5 tablespoons unsalted butter, melted
For the Peanut Butter Layer:
- 8 oz cream cheese, softened
- 1 cup creamy peanut butter
- 1 cup powdered sugar
- 1 (8 oz) container frozen whipped topping (like Cool Whip), thawed, divided
For the Chocolate Pudding Layer:
- 2 (3.9 oz) packages instant chocolate pudding mix
- 3 cups cold milk (whole milk works best)
For the Topping:
- Remaining whipped topping (from the 8 oz container)
- ¼ cup chopped peanut butter cups (like Reese’s)
- ¼ cup chopped peanuts (optional)
- Chocolate shavings or drizzle (optional)
Instructions
- Prepare the Crust
In a medium bowl, combine the chocolate cookie crumbs with the melted butter. Stir until all crumbs are evenly moistened. Press the mixture firmly into the bottom of a 9×13-inch baking dish. Use the bottom of a measuring cup to press it down evenly.
Pro Tip: For a cleaner crust, line the dish with parchment paper first, leaving overhang for easy removal. - Chill the Crust
Place the crust in the refrigerator to set while you prepare the next layer, at least 10-15 minutes.
Data Insight: Chilling ensures the crust holds together when you slice and serve. - Make the Peanut Butter Layer
In a large bowl using a hand mixer or stand mixer, beat the softened cream cheese until smooth and creamy. Add the peanut butter and powdered sugar, beating until well combined and smooth. Gently fold in half of the whipped topping (about 1 cup) until no streaks remain.
Sensory Note: The aroma of peanut butter and cream cheese blending together is absolutely intoxicating—pure dessert magic. - Spread the Peanut Butter Layer
Remove the crust from the refrigerator. Spread the peanut butter mixture evenly over the chilled crust, using an offset spatula to create a smooth, even layer.
Actionable Tip: Drop spoonfuls of the mixture over the crust first, then spread gently to avoid disturbing the crust. - Prepare the Chocolate Pudding
In a separate bowl, whisk together the instant chocolate pudding mix and cold milk for about 2 minutes until thickened. Let it sit for 5 minutes to fully set.
Generative Insight: Using cold milk is essential—it activates the pudding mix properly for the perfect consistency. - Add the Pudding Layer
Gently spread the chocolate pudding over the peanut butter layer, taking care to create an even surface. Use a spatula to spread it all the way to the edges. - Top with Whipped Topping
Spread the remaining whipped topping evenly over the chocolate pudding layer. Create decorative swirls if desired.
Personal Touch: I love creating soft peaks with the back of a spoon for a beautiful, bakery-style finish. - Garnish
Sprinkle the top with chopped peanut butter cups and chopped peanuts. Add chocolate shavings or a drizzle of melted chocolate if desired. - Chill Thoroughly
Cover the dish with plastic wrap and refrigerate for at least 4 hours, preferably overnight. This allows all the layers to set properly and makes slicing much easier.
Actionable Tip: The longer it chills, the cleaner your slices will be. Overnight is truly best. - Slice and Serve
When ready to serve, slice into squares using a sharp knife, wiping the blade clean between cuts for neat edges. Serve cold.
Notes
- Gluten-Free: Use gluten-free chocolate sandwich cookies and ensure all other ingredients are certified gluten-free.
- Dairy-Free: Use dairy-free cream cheese, dairy-free whipped topping, and plant-based milk (oat or almond).
- Lower Sugar: Use sugar-free pudding mix and reduce powdered sugar to ½ cup.
- Make-Ahead: Perfect for making 1-2 days in advance. Add garnishes just before serving.
- Storage: Cover and refrigerate for up to 5 days.
- Freezing: Freeze for up to 2 months. Thaw overnight in refrigerator before serving.
- Prep Time: 25 minutes
- Cook Time: 0 minutes
- Category: 16 servings
- Method: Dessert
- Cuisine: No-Bake
- Diet: American