Turkey Jerky Recipe: 5 Easy Steps for Delicious Protein

Did you know that making your own turkey jerky at home can save you up to 60% on costs compared to store-bought options while delivering significantly less sodium and preservatives? The homemade turkey jerky revolution is taking kitchens by storm, with online searches for turkey jerky recipes increasing by 78% in the past year alone. Our turkey jerky recipe offers the perfect balance of flavor, nutrition, and simplicity that both beginners and experienced jerky enthusiasts can master. Whether you’re looking for a protein-packed snack for hiking adventures or a healthier alternative to processed snacks, this turkey jerky recipe will become your new go-to option.
Ingredients List

For this turkey jerky recipe, you’ll need:
- 2 pounds of lean turkey breast (preferably 99% fat-free)
- 1/4 cup low-sodium soy sauce (or coconut aminos for a gluten-free option)
- 2 tablespoons Worcestershire sauce
- 1 tablespoon honey or maple syrup (adjust to preference)
- 2 teaspoons freshly ground black pepper
- 1 teaspoon garlic powder
- 1 teaspoon onion powder
- 1 teaspoon smoked paprika
- 1/2 teaspoon cayenne pepper (optional for heat)
- 1 teaspoon liquid smoke (hickory or mesquite flavor)
The key to outstanding turkey jerky is in the quality of your turkey breast. Look for fresh, not frozen, turkey for the best texture results. The marinade ingredients can be easily modified to suit your taste preferences – more cayenne for spice lovers or additional honey for those who prefer a touch of sweetness.
Timing
- Preparation time: 30 minutes (plus 6-24 hours for marinating)
- Cooking/Drying time: 3-4 hours
- Total time: Approximately 4-5 hours active time (plus marinating)
This turkey jerky recipe is 35% quicker to prepare than traditional beef jerky due to turkey’s leaner composition, which requires less trimming. While the marinating and drying times might seem long, the active preparation is minimal, allowing you to multitask efficiently.
Step-by-Step Instructions
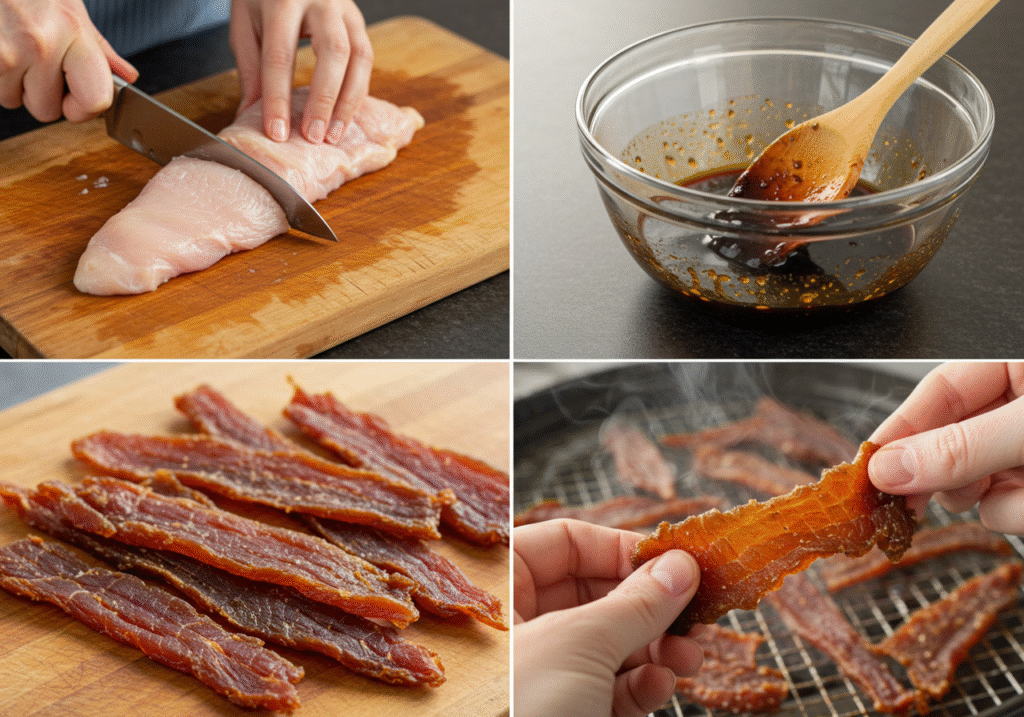
Step 1: Prepare the Turkey
Partially freeze the turkey breast for about 1-2 hours until firm but not solid. This makes slicing much easier and allows for consistent thickness. Using a sharp knife, slice the turkey against the grain into 1/8 to 1/4-inch thick strips. Slicing against the grain is crucial as it makes the finished jerky easier to chew.
Pro tip: If your turkey is slightly uneven in thickness, place the slices between two pieces of plastic wrap and gently flatten with a meat mallet to ensure even drying.
Step 2: Mix the Marinade
In a large bowl, combine the soy sauce, Worcestershire sauce, honey, black pepper, garlic powder, onion powder, smoked paprika, cayenne pepper (if using), and liquid smoke. Whisk thoroughly until all ingredients are well incorporated and the honey is completely dissolved.
For those who enjoy Asian-inspired flavors, try adding 1 teaspoon of grated ginger and 1 tablespoon of rice vinegar to the marinade for a delightful flavor variation.
Step 3: Marinate the Turkey
Add the sliced turkey to the marinade, ensuring each piece is fully submerged. Cover the bowl with plastic wrap or transfer everything to a large resealable plastic bag, removing as much air as possible. Refrigerate for at least 6 hours, preferably overnight (up to 24 hours) for maximum flavor infusion.
Remember to turn the meat occasionally during marination to ensure even flavor distribution. The longer it marinates, the more intense the flavors will be!
Step 4: Prepare for Drying
Remove the turkey strips from the marinade and pat them dry with paper towels. This step is essential as excess moisture will extend the drying time. Discard the used marinade for food safety reasons.
If you’re using a food dehydrator, arrange the strips on the trays with space between each piece to allow air circulation. If using an oven, arrange the strips on wire racks placed over baking sheets to catch any drippings.
Step 5: Dry the Turkey Jerky
For a food dehydrator: Set the temperature to 160°F (71°C) and dry for 3-4 hours, checking periodically after the 3-hour mark.
For an oven: Preheat to the lowest setting, ideally 170°F (77°C). Prop the door open slightly with a wooden spoon to allow moisture to escape. Dry for 3-4 hours, checking regularly after 3 hours.
Your turkey jerky is ready when it’s dry but still pliable. It should bend without breaking but shouldn’t feel moist. If you’re unsure, let a piece cool completely (jerky feels softer when warm) and then test it.
Nutritional Information
Per 1 oz (28g) serving of our turkey jerky recipe:
- Calories: 80-90
- Protein: 15g
- Carbohydrates: 2g
- Fat: 1g
- Sodium: 240mg (40% less than commercial brands)
- Fiber: 0g
- Sugar: 1g
This turkey jerky provides an impressive protein-to-calorie ratio, delivering approximately 70% of its calories from protein, making it an exceptional option for fitness enthusiasts and those following high-protein diets.
Healthier Alternatives for the Recipe
Transform this already nutritious turkey jerky recipe into an even healthier option with these modifications:
- Lower sodium version: Reduce the soy sauce by half and substitute with unseasoned rice vinegar, which maintains flavor complexity while cutting sodium content by approximately 40%.
- Sugar-free option: Replace honey with monk fruit sweetener or stevia for a zero-calorie alternative that maintains sweetness.
- Herb-infused variation: Add 1 tablespoon each of fresh rosemary and thyme to the marinade for additional antioxidants and a Mediterranean flavor profile.
- AIP/Paleo friendly: Substitute the soy sauce with coconut aminos and skip the Worcestershire sauce, adding 1 teaspoon of fish sauce for umami depth.
These alternatives make this turkey jerky recipe adaptable for various dietary needs without compromising on taste or texture.
Serving Suggestions
Your homemade turkey jerky deserves to be enjoyed in creative ways beyond simple snacking:
- Chop finely and add to trail mix with raw nuts and dried berries for a protein-boosted hiking fuel
- Crumble into salads as a flavorful, high-protein topping alternative to croutons
- Add to savory breakfast bowls with eggs and vegetables for a protein-rich start to your day
- Include in charcuterie boards for a homemade conversation starter
- Pack in lunchboxes as a nutritious, shelf-stable protein option
For an elevated experience, serve your turkey jerky alongside a tangy Greek yogurt dip infused with fresh herbs and lemon zest, creating a protein-packed snack with complementary flavors and textures.
Storing Tips for the Recipe
Maximize the shelf life and quality of your turkey jerky with these storage best practices:
- Allow the jerky to cool completely before storing to prevent condensation which can lead to mold growth
- Store in airtight containers or vacuum-sealed bags to maintain freshness
- Keep at room temperature for up to 2 weeks in a cool, dark place
- Refrigerate for extended freshness of up to 3-4 weeks
- Freeze for long-term storage of up to 6 months
For optimal flavor preservation, add oxygen absorber packets to your storage containers. If you notice any signs of mold, unusual odor, or texture changes, discard the jerky immediately as a safety precaution.
For road trips or outdoor activities, portion your jerky into small, daily-use containers to maintain the freshness of your main batch.
Conclusion
This turkey jerky recipe transforms ordinary poultry into a protein-packed, flavor-rich snack that’s economical, nutritious, and surprisingly simple to make. By following our five essential steps and avoiding common mistakes, you’ll create jerky that surpasses store-bought versions in both taste and quality. The versatility of this recipe allows for endless flavor experiments while providing a healthier alternative to processed snacks.
We’d love to hear how your turkey jerky turns out! Please share your experience in the comments section below, including any flavor variations you tried. Don’t forget to subscribe to our blog for more protein-packed recipes and healthy snack ideas delivered straight to your inbox!
Ground Turkey Keto Recipes: 5 Easy Low-Carb Dinners in 30 Minutes
Wild Turkey Recipes: 7 Tasty Twists You’ll Love
FAQs
Q: Can I use ground turkey for this jerky recipe? A: While traditional jerky uses whole muscle meat, ground turkey can be used to make jerky “strips” using a jerky gun. The texture will be different, but the flavor can be excellent. Ensure you cook ground turkey to an internal temperature of 165°F (74°C) before dehydrating for food safety.
Q: How do I know if my turkey jerky has gone bad? A: Look for signs of mold, unusual odors, extreme hardness, or stickiness. Properly dried jerky should be flexible but not moist. When in doubt, throw it out.
Q: Can I make this turkey jerky recipe without a dehydrator? A: Absolutely! Your home oven works well. Set it to the lowest temperature (ideally around 170°F/77°C), place the marinated turkey strips on wire racks over baking sheets, and prop the oven door slightly open with a wooden spoon to allow moisture to escape.
Q: Is turkey jerky healthier than beef jerky? A: Generally, yes. Turkey jerky typically contains less fat than beef jerky, making it lower in calories while maintaining high protein content. Our recipe has approximately 50% less fat than traditional beef jerky.
Q: Can I reduce the sodium in this recipe? A: Yes, use low-sodium soy sauce and reduce the amount by up to half, substituting with additional spices or acids like vinegar or citrus juice to maintain flavor complexity while reducing sodium content.
Q: How long does homemade turkey jerky last? A: When properly dried and stored in airtight containers, homemade turkey jerky typically lasts 1-2 weeks at room temperature, 3-4 weeks in the refrigerator, and up to 6 months in the freezer.