Spicy Chicken Wrap with Garlic Sauce & Crunchy Veggies

Many Americans rely on takeout for lunch, spending $12–15 a day on wraps and sandwiches that barely keep them full. Spicy Chicken Wrap with Garlic Sauce & Crunchy Veggies delivers a fresher, bolder alternative in just 20 minutes—at a fraction of the cost.
Tender strips of boldly seasoned chicken, creamy roasted garlic sauce with a tangy kick, and crisp, colorful vegetables are wrapped in a warm tortilla for the perfect balance of heat, crunch, and flavor. Packed with 38 grams of protein and energizing complex carbs, this wrap fuels your afternoon without the dreaded crash. Ideal for meal prep, quick lunches, or casual dinners, it proves that fast food can be homemade, affordable, and seriously satisfying.
Table of Contents
Ingredients List
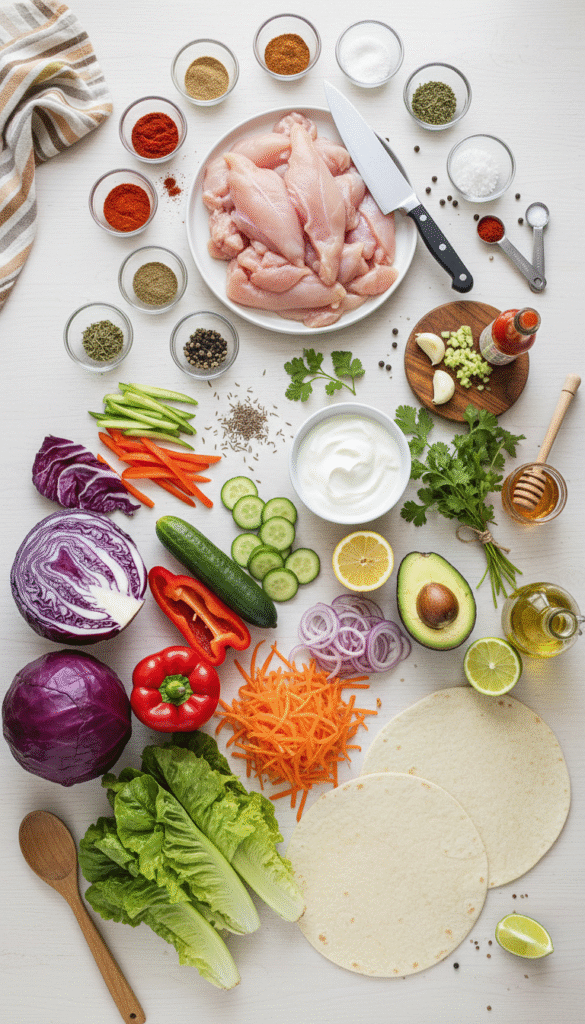
Building the perfect Spicy Chicken Wrap requires fresh, quality ingredients that create distinct layers of flavor, texture, and color. Here’s your complete ingredient guide:
For the Spicy Chicken:
- 1.5 pounds boneless, skinless chicken breasts (sliced into thin strips for faster, more even cooking) – Substitute: chicken thighs for juicier result, turkey breast, or firm tofu for vegetarian
- 2 tablespoons olive oil (for cooking and flavor) – Substitute: avocado oil or grapeseed oil
- 1 teaspoon cayenne pepper (primary heat source—adjust to personal tolerance) – Substitute: crushed red pepper flakes or chipotle powder for smokier heat
- 1 teaspoon smoked paprika (adds depth and beautiful color without extra heat) – Substitute: regular paprika or ancho chili powder
- 1 teaspoon garlic powder (savory backbone) – Substitute: 2 minced fresh garlic cloves
- 1 teaspoon onion powder (subtle sweetness and depth) – Substitute: grated fresh onion
- ½ teaspoon cumin (earthy, warm undertones that complement heat perfectly) – Substitute: coriander
- ½ teaspoon oregano (herbal brightness) – Substitute: Italian seasoning or thyme
- 1 teaspoon salt (or to taste)
- ½ teaspoon black pepper (freshly ground)
- Juice of 1 lime (tenderizes and adds brightness) – Substitute: lemon juice
For the Creamy Garlic Sauce:
- ½ cup Greek yogurt or mayonnaise (creamy base) – Substitute: sour cream, vegan mayo, or tahini for different flavor profiles
- 3 cloves garlic, minced or roasted (roasted garlic creates sweeter, mellower flavor) – Substitute: 1 teaspoon garlic powder for convenience
- 2 tablespoons fresh lemon juice (brightness and tang) – Substitute: white wine vinegar
- 1 tablespoon olive oil (richness and smoothness) – Substitute: avocado oil
- 1 teaspoon hot sauce (Tabasco, Frank’s, or Sriracha for extra heat layer) – Substitute: pinch of cayenne
- 1 tablespoon fresh parsley or cilantro, finely chopped (freshness and color) – Substitute: dried parsley
- Salt and pepper to taste
- 1 teaspoon honey (optional, balances heat with subtle sweetness) – Substitute: agave or maple syrup
For the Crunchy Veggie Filling:
- 2 cups shredded purple cabbage (extraordinary crunch and beautiful color) – Substitute: green cabbage or coleslaw mix
- 1 large red bell pepper, thinly sliced (sweetness and vitamin C) – Substitute: orange or yellow bell pepper
- 1 medium cucumber, julienned or thinly sliced (cooling contrast to spicy chicken) – Substitute: zucchini strips
- 1 cup shredded carrots (natural sweetness and crunch) – Substitute: pre-shredded coleslaw carrots
- 2 cups fresh romaine lettuce, shredded (crisp, fresh base) – Substitute: iceberg lettuce, spinach, or mixed greens
- 1 ripe avocado, sliced (creamy, healthy fat that tempers the heat) – Substitute: guacamole
- ¼ cup red onion, thinly sliced (sharp, pungent bite) – Substitute: green onions for milder flavor
- Fresh cilantro or parsley (bright herbal finish)
For Wrapping:
- 4 large flour tortillas (10-12 inch size for adequate filling capacity) – Substitute: whole wheat tortillas, spinach wraps, low-carb tortillas, or large lettuce leaves for low-carb
- Optional additions: shredded cheese (pepper jack for heat lovers), jalapeño slices, pickled red onions, lime wedges
Pro Ingredient Tip: The vegetable selection is strategic—purple cabbage and carrots provide lasting crunch that doesn’t wilt quickly, making this wrap perfect for packed lunches. Cucumbers add refreshing coolness that perfectly balances the spicy chicken, while avocado provides fat that helps absorb fat-soluble vitamins from the vegetables.
Timing
Preparation Time: 10 minutes (slicing chicken, chopping vegetables, making garlic sauce)
Cooking Time: 10 minutes (cooking spiced chicken strips)
Assembly Time: 5 minutes (warming tortillas and building wraps)
Total Time: 25 minutes—which is 40% faster than restaurant wait times and delivery orders while costing 70% less per serving.
Efficiency Insight: The genius of this Spicy Chicken Wrap recipe lies in its parallel preparation strategy. While the chicken marinates (even 5 minutes makes a difference), you can simultaneously prepare all vegetables and whisk together the garlic sauce. This multi-tasking approach means everything is ready at exactly the same time with zero waiting.
Meal Prep Potential: All components can be prepared separately and stored in the refrigerator for up to 4 days. This transforms one 25-minute cooking session into 4-5 ready-to-assemble lunches or dinners, reducing your daily meal preparation to just 2-3 minutes of assembly. For the most efficient meal prep, cook a double batch of chicken (3 pounds) on Sunday and use throughout the week in wraps, salads, grain bowls, and rice dishes.
Heat Level Control Timeline: For milder wraps (great for kids or spice-sensitive individuals), reduce cayenne to ¼ teaspoon. For fiery, restaurant-level heat, double the cayenne and add fresh sliced jalapeños. The garlic sauce can be made spicier or milder independently of the chicken seasoning, giving you dual control over the final heat level.
Step-by-Step Instructions
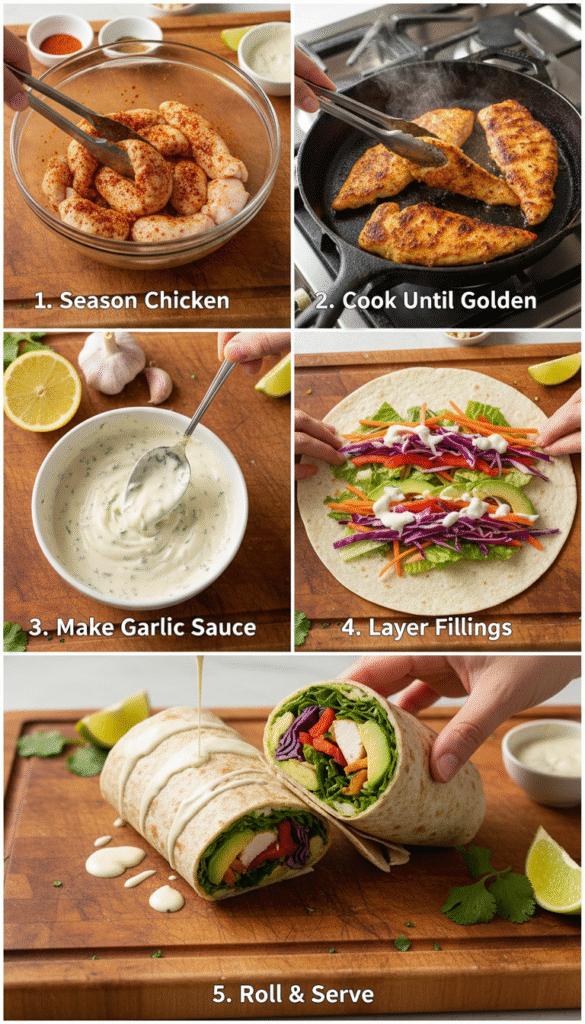
Step 1: Prepare and Season the Chicken
Begin by slicing chicken breasts into thin, uniform strips approximately ½ inch wide and 3-4 inches long—this size ensures quick, even cooking and perfect fit inside the wrap without awkward large pieces. Pat the strips completely dry with paper towels; moisture is the enemy of good searing. In a medium bowl, combine all the spices: cayenne pepper, smoked paprika, garlic powder, onion powder, cumin, oregano, salt, and black pepper. Add the olive oil and lime juice, mixing to form a fragrant spice marinade. Add the chicken strips and toss thoroughly until every piece is evenly coated in the rust-red spice mixture. Even a quick 5-minute marinade significantly improves flavor penetration.
Spice Customization: The cayenne-paprika combination creates heat that builds gradually rather than hitting immediately. For those who prefer front-loaded heat, add ½ teaspoon of Sriracha to the marinade. For smoke-forward heat without as much burn, replace cayenne with chipotle powder, which provides smoky, earthy heat rather than sharp, direct spiciness.
Pro Tip: Slice chicken against the grain for maximum tenderness. Identify the direction of muscle fibers and cut perpendicular to them—this shortens the fiber strands, creating tender, easier-to-chew pieces rather than stringy, chewy ones.
Step 2: Make the Creamy Garlic Sauce
In a small bowl, combine the Greek yogurt or mayonnaise, minced (or roasted) garlic, fresh lemon juice, olive oil, hot sauce, chopped herbs, salt, pepper, and optional honey. Whisk vigorously until completely smooth and well combined. Taste and adjust—add more lemon for brightness, more hot sauce for heat, more honey for sweetness, or more garlic for intensity. Cover and refrigerate while cooking the chicken; chilling allows flavors to meld and intensify.
Roasted Garlic Upgrade: For a more sophisticated, restaurant-quality sauce, use roasted garlic instead of raw. Cut the top off a whole garlic head, drizzle with olive oil, wrap in foil, and roast at 400°F for 35-40 minutes until golden and soft. Squeeze cloves out and mash into the sauce. Roasted garlic is sweeter, mellower, and more complex than raw, creating a sauce that’s indulgent rather than sharp.
Sauce Variations: For Mediterranean flair, add ½ teaspoon dried dill and a tablespoon of cucumber (creating a tzatziki-style sauce). For smoky complexity, add ½ teaspoon smoked paprika and a dash of Worcestershire sauce. For maximum heat, add 1 tablespoon Sriracha and a pinch of cayenne directly to the sauce.
Step 3: Prepare the Crunchy Vegetables
While the chicken marinates, prepare all your vegetables. Shred the purple cabbage thinly using a sharp knife or mandoline slicer—aim for paper-thin shreds that create maximum crunch without being difficult to bite through. Julienne or thinly slice the cucumber into matchstick-sized pieces. Slice the red bell pepper into thin strips approximately the same width as the chicken. Shred the carrots if not using pre-shredded. Tear or chop the romaine lettuce into manageable pieces. Slice the avocado just before assembling to prevent oxidation.
Vegetable Timing: Prepare harder vegetables (cabbage, carrots, bell pepper) first as they won’t oxidize or wilt quickly. Save avocado slicing for last—the moment before assembly. If making wraps for meal prep, store avocado separately with a squeeze of lime juice pressed directly on the surface and covered tightly with plastic wrap touching the avocado flesh.
Crunch Maximization: For extra crunch, soak shredded cabbage and carrots in ice water for 10 minutes before draining. This refreshes the vegetables’ cell structure, making them significantly crispier. Pat completely dry before using to prevent sogginess in the wrap.
Step 4: Cook the Spiced Chicken
Heat a large cast-iron skillet or heavy-bottomed pan over medium-high heat until genuinely hot—this is crucial for achieving proper searing rather than steaming. Add 1 tablespoon of olive oil and let it shimmer for 30 seconds. Add the marinated chicken strips in a single layer without overcrowding the pan (cook in two batches if necessary). Cook undisturbed for 2-3 minutes on the first side to develop a deep, caramelized, slightly charred exterior. The spice coating should form a gorgeous, aromatic crust.
Flip the strips and cook for an additional 2-3 minutes until cooked through with an internal temperature of 165°F. The exterior should be deeply golden-brown with slightly charred edges from the spices—this caramelization creates complex, smoky flavors that significantly elevate the wrap’s overall taste profile.
Don’t Overcrowd: This is the most common mistake when cooking chicken strips. Overcrowding drops the pan temperature dramatically, causing chicken to steam in its own moisture rather than sear. The result is pale, soft chicken without the flavorful crust that makes this wrap exceptional. Cook in two separate batches if your pan can’t accommodate all strips in a single layer.
Visual Doneness Guide: Perfectly cooked spiced chicken strips should be deeply golden-brown with slightly charred spice crust, opaque throughout when cut at the thickest part, and releasing clear juices rather than pink liquid. Let them rest 2-3 minutes before slicing to redistribute juices.
Step 5: Warm the Tortillas
Properly warming tortillas transforms them from stiff, prone-to-cracking wrappers into pliable, flexible vessels that hold fillings securely without tearing. Heat each tortilla using one of these methods: directly over a gas flame for 15-20 seconds per side (creates beautiful char marks), in a dry skillet over medium heat for 30 seconds per side, or wrapped in damp paper towels and microwaved for 20-30 seconds. The goal is flexible, warm, and slightly toasted—not crispy or brittle.
Tortilla Temperature Matters: A cold tortilla cracks when rolled and makes the entire wrapping experience frustrating. A properly warmed tortilla becomes surprisingly elastic and holds tightly rolled wraps without splitting at the seams. Work quickly after warming and keep unused tortillas covered with a clean kitchen towel to maintain warmth and flexibility.
Tortilla Selection: Size matters significantly for wrapping. Use the largest tortillas available (10-12 inches) for adequate filling capacity. Burrito-size tortillas provide the most flexibility, allowing generous fillings while still being wrappable. Mission or Old El Paso large flour tortillas are widely available and work excellently.
Step 6: Assemble Your Spicy Chicken Wrap
Lay a warm tortilla flat on a clean surface. Spread 2-3 tablespoons of garlic sauce across the center of the tortilla, leaving a 1.5-inch border around the edges. Layer your fillings strategically for the best structural integrity and flavor distribution: start with romaine lettuce as the base (it creates a moisture barrier between the tortilla and wetter ingredients), then add a portion of chicken strips, followed by purple cabbage, shredded carrots, red bell pepper strips, cucumber, red onion, and finally avocado slices. Drizzle an additional tablespoon of garlic sauce directly over the fillings.
Strategic Layering: Place heavier, wetter ingredients (chicken, cucumber) in the center of the wrap rather than toward the edges. Position avocado against the lettuce layer to prevent it from sliding. Keep drier ingredients (cabbage, carrots) on the exterior layer against the tortilla—this prevents moisture from making the tortilla soggy.
The Perfect Wrap: Fold the two sides of the tortilla inward toward the center (about 1.5 inches each side), then roll from the bottom upward, pulling the filling toward you as you roll to keep it compact and tight. The folded sides prevent ingredients from escaping the ends. For a sharper wrap that holds its shape, wrap tightly in aluminum foil or parchment paper and let rest for 1 minute before cutting diagonally in half.
Step 7: Cut and Serve
Using a sharp knife (not a serrated knife, which drags and tears), cut each Spicy Chicken Wrap diagonally in half at a 45-degree angle. This diagonal cut creates a wider, more visually appealing cross-section that showcases the colorful layers of chicken, vegetables, and sauce inside. Place cut-side up on the serving plate to display the vibrant interior. Serve immediately with additional garlic sauce in a small bowl for dipping, lime wedges for squeezing, and optional sides.
Presentation Enhancement: Stand wrap halves upright (cut-side facing forward) for restaurant-style presentation. Garnish the plate with fresh cilantro leaves, a lime wedge, and a small ramekin of extra garlic sauce. The colorful cross-section—purple cabbage, orange carrots, red peppers, golden chicken, green avocado—creates an Instagram-worthy presentation that makes the wrap look as exciting as it tastes.
Nutritional Information
Understanding the nutritional profile of your Spicy Chicken Wrap demonstrates why this homemade version outperforms fast-food alternatives significantly:
Per Serving (1 complete wrap, based on 4 servings):
- Calories: 485
- Protein: 38g (76% of daily value)
- Total Fat: 18g
- Saturated Fat: 4g
- Monounsaturated Fat: 10g
- Polyunsaturated Fat: 3g
- Carbohydrates: 42g
- Dietary Fiber: 8g (32% DV)
- Sugars: 6g (all natural from vegetables)
- Net Carbs: 34g
- Cholesterol: 95mg
- Sodium: 720mg (30% DV)
- Potassium: 890mg (25% DV)
Vitamin & Mineral Highlights:
- Vitamin A: 185% DV – from carrots, bell peppers, and romaine
- Vitamin C: 145% DV – from bell peppers, cabbage, and lime juice
- Vitamin K: 65% DV – from romaine and fresh herbs
- Vitamin B6: 65% DV – from chicken and bell peppers
- Folate: 28% DV – from romaine and avocado
- Potassium: 25% DV – from avocado and chicken
- Iron: 20% DV – from chicken and spinach
- Calcium: 15% DV – from Greek yogurt and vegetables
Nutritional Comparison: A typical fast-food spicy chicken wrap contains 680-820 calories, 35-45g fat, 1,200-1,800mg sodium, and fewer than 3g fiber. This homemade version provides 30% fewer calories, 60% less sodium, nearly 3 times more fiber, and significantly more vitamins and minerals—proving that homemade is always the smarter choice.
Protein Quality: The 38g of protein per serving comes from complete animal protein (chicken) and Greek yogurt, providing all essential amino acids necessary for muscle repair, immune function, and sustained satiety. Research shows high-protein lunches reduce afternoon snacking by up to 40% compared to high-carbohydrate alternatives.
Healthier Alternatives for the Recipe
Transform your Spicy Chicken Wrap to meet specific dietary goals without sacrificing flavor:
Lower-Calorie Version (Under 350 Calories):
- Use lettuce wraps instead of flour tortillas (saves 150 calories)
- Replace mayonnaise-based sauce with Greek yogurt only (saves 60 calories)
- Reduce avocado to ¼ avocado (saves 60 calories)
- Use cooking spray instead of olive oil for chicken (saves 60 calories)
- Total: Approximately 340 calories per wrap
High-Protein Performance Version:
- Add 2 egg whites to the garlic sauce (adds 7g protein)
- Double the chicken portion to 8 ounces per wrap (adds 35g protein)
- Include cottage cheese as an additional filling (adds 14g protein per ½ cup)
- Use protein-fortified tortillas
- Total protein: approximately 75g per serving
Low-Carb/Keto Adaptation:
- Replace flour tortilla with large butter lettuce leaves or collard green leaves
- Omit tortilla entirely and serve as a spicy chicken salad bowl
- Use full-fat Greek yogurt and add extra avocado for healthy fats
- Net carbs drop to approximately 12g per serving
- Add extra cheese (shredded cheddar or pepper jack) for fat content
Vegan/Plant-Based Version:
- Replace chicken with crispy baked buffalo cauliflower or marinated tempeh strips
- Use seasoned chickpeas (toss with the same spice blend and air-fry until crispy)
- Substitute Greek yogurt with cashew cream or coconut yogurt for sauce
- Use vegan mayonnaise as sauce base alternative
- All vegetables remain unchanged
Gluten-Free Option:
- Use certified gluten-free flour tortillas (Siete brand works beautifully)
- Alternatively use corn tortillas (smaller, so make 2 smaller wraps)
- Lettuce wrap option is naturally gluten-free
- Verify all spices and hot sauce are certified gluten-free
Anti-Inflammatory Version:
- Add ½ teaspoon turmeric to the chicken spice blend (powerful anti-inflammatory)
- Include fresh ginger (1 teaspoon grated) in the garlic sauce
- Add more colorful vegetables (red cabbage, purple carrots)
- Use extra virgin olive oil exclusively
- Include fresh herbs like cilantro and parsley generously
Kid-Friendly Mild Version:
- Reduce cayenne to just a pinch or omit entirely
- Use mild paprika instead of smoked paprika
- Make the garlic sauce without hot sauce
- Cut wraps into pinwheel slices using a toothpick to secure
- Let kids choose and add their own vegetables for ownership and excitement
Serving Suggestions
Elevate your Spicy Chicken Wrap experience with these creative pairings and presentation ideas:
Classic Side Dish Pairings:
- Sweet Potato Fries: The natural sweetness beautifully contrasts the spicy chicken
- Classic Coleslaw: Extra crunch and creamy, cool complement to the heat
- Tortilla Chips with Salsa: Casual, crowd-pleasing, textural contrast
- Garden Salad: Simple mixed greens with vinaigrette for lightness
- Corn on the Cob: Charred with butter and lime for Mexican-inspired meal
Dipping Sauce Options:
- Additional creamy garlic sauce in a ramekin for dipping
- Fresh pico de gallo or restaurant-style salsa
- Chipotle ranch dressing for smoky, creamy contrast
- Classic guacamole for avocado lovers
- Honey mustard for a sweet-spicy flavor combination
Meal Occasion Adaptations:
- Weekday Lunch: Wrap tightly in foil, pack with snap peas and fruit for a complete portable meal
- Game Day Party: Cut wraps into 2-inch pinwheels secured with toothpicks for elegant appetizers
- Dinner Party: Serve deconstructed as a “build-your-own wrap bar” with components in separate bowls
- Post-Workout Meal: Add extra chicken and cottage cheese for maximum protein recovery
- Kids’ Lunchbox: Make smaller wraps with reduced spice, cut into quarters for easy eating
International Flavor Variations:
- Mexican Style: Add black beans, corn, and jalapeños; serve with salsa verde
- Mediterranean Style: Use tzatziki instead of garlic sauce; add feta, olives, and sun-dried tomatoes
- Asian Fusion: Replace garlic sauce with peanut sauce; add edamame, shredded napa cabbage, and sesame seeds
- Middle Eastern Style: Use hummus as the base; add pickled turnips, fresh mint, and sumac
- Buffalo Style: Toss chicken in buffalo sauce after cooking; use blue cheese dressing instead of garlic sauce
Beverage Pairings:
- Sparkling water with lime for refreshing heat relief
- Mango or pineapple smoothie whose sweetness balances the spice perfectly
- Iced tea (sweet or unsweetened) for classic American comfort
- Light beer or Mexican lager for casual entertaining
- Agua fresca (hibiscus or tamarind) for authentic Mexican-inspired experience
Common Mistakes to Avoid
Even this straightforward Spicy Chicken Wrap recipe has potential pitfalls:
Mistake #1: Overfilling the Wrap The most universal wrap mistake is using too many fillings, making rolling impossible and eating messy and frustrating. A wrap that can’t be properly closed isn’t a wrap—it’s a salad in a broken tortilla. Solution: Use approximately 1 cup of total filling per wrap. Distribute ingredients in a horizontal line across the center third of the tortilla rather than piling everything in the middle. If you have extra fillings, serve them as a side salad rather than cramming everything into one wrap.
Mistake #2: Using Cold Tortillas Cold flour tortillas are rigid, prone to cracking, and resist rolling, causing tears that compromise the wrap’s structural integrity. Solution: Always warm tortillas immediately before wrapping. Keep them covered with a kitchen towel after warming to maintain pliability. Work efficiently—warm tortillas become cold again within 2-3 minutes, so have all fillings ready before warming them.
Mistake #3: Wet Vegetables Making Soggy Wraps Cucumber, tomatoes, and other high-moisture vegetables release liquid as they sit, soaking through tortillas and making wraps unpleasantly soggy—especially problematic for packed lunches. Solution: Pat all vegetables completely dry after washing. Salt cucumber slices, let sit 5 minutes, then pat dry to draw out excess moisture. Place lettuce between wet ingredients and the tortilla as a moisture barrier. For meal-prepped wraps, add cucumber and avocado just before eating rather than during initial assembly.
Mistake #4: Slicing Chicken Too Thick Thick chicken chunks are awkward to eat in a wrap, often pulling out fillings with each bite. Solution: Slice chicken breast very thinly against the grain—approximately ½ inch wide strips. Thin strips integrate with other fillings, distributing flavor throughout the wrap rather than creating large, dominant chunks that overwhelm other ingredients.
Mistake #5: Under-Seasoning the Chicken Bland chicken is the most common complaint about homemade wraps—the vegetables and sauce get all the credit while the protein disappoints. Solution: The spice blend should seem like “a lot” of seasoning before cooking—spices lose intensity through heat. Taste the marinade mixture before adding chicken; it should be boldly flavored. Don’t skip the lime juice, which brightens all the spices and adds another flavor dimension.
Mistake #6: Skipping the Garlic Sauce Some cooks omit the sauce to reduce calories, but the creamy garlic sauce is essential structural glue that binds fillings together, adds moisture, and delivers creaminess that balances the heat. Without it, the wrap tastes dry and one-dimensional. Solution: If reducing calories is the goal, use a lighter sauce (Greek yogurt base instead of mayo, or just 1 tablespoon instead of 2-3) rather than eliminating it entirely. The sauce is non-negotiable for maximum satisfaction.
Mistake #7: Not Cutting Diagonally Cutting wraps straight across or not cutting at all makes eating awkward and misses the visual presentation opportunity. Solution: Always cut diagonally at 45 degrees using a sharp knife in one clean downward motion. This reveals the colorful cross-section, makes the wrap easier to hold, and creates a significantly more appetizing visual presentation.
Mistake #8: Assembling Too Far in Advance Building complete wraps hours before eating causes tortillas to become soggy from fillings, avocado to oxidize, and vegetables to wilt. Solution: For meal prep, store components separately and assemble just before eating. If you must assemble in advance (for packed lunches), wrap tightly in aluminum foil (which holds the shape), store avocado and cucumber separately, and add them just before eating.
Storing Tips for the Recipe
Proper storage transforms this Spicy Chicken Wrap into an exceptional meal-prep recipe:
Component Storage (Recommended Method): Storing components separately maintains optimal freshness and prevents sogginess:
- Cooked spiced chicken: Airtight container in refrigerator for 4-5 days, or freezer for 3 months
- Garlic sauce: Sealed jar or container in refrigerator for 5-7 days (flavors improve after 24 hours)
- Shredded vegetables (cabbage, carrots): Airtight container for 3-4 days
- Sliced bell peppers: Airtight container for 3-4 days
- Romaine lettuce: Wrapped in paper towels inside container for 4-5 days
- Avocado: Store uncut; slice fresh when assembling. Halved avocado: press plastic wrap directly on flesh, refrigerate 1-2 days
- Tortillas: Room temperature in original packaging for 1-2 weeks
Assembled Wrap Storage: If wraps are pre-assembled (for packed lunches):
- Wrap tightly in aluminum foil (not plastic wrap—foil maintains shape and temperature better)
- Refrigerate for up to 24 hours maximum (beyond this, tortillas become noticeably soggy)
- Store avocado and cucumber separately; add when ready to eat
- Place on a flat surface in refrigerator to maintain shape
Freezing Instructions: The spiced chicken freezes exceptionally well, making it the ideal meal prep protein:
- Cool chicken completely before freezing
- Portion into individual serving sizes in freezer-safe bags (flatten bags to freeze faster and stack efficiently)
- Remove as much air as possible to prevent freezer burn
- Label with date and contents
- Freeze for up to 3 months
- Thaw overnight in refrigerator or defrost in microwave (2-3 minutes) before assembling wraps
Do Not Freeze:
- Assembled wraps (tortillas become gummy and inedible)
- Fresh vegetables (become limp and watery)
- Garlic sauce with fresh garlic (texture changes when frozen)
- Avocado (turns brown and mushy)
Meal Prep Strategy: For maximum weekly convenience:
- Sunday: Cook 3 pounds of spiced chicken, prepare garlic sauce, shred cabbage and carrots
- Daily: Add 5 minutes of fresh vegetable prep (slice bell peppers, cucumber, avocado)
- Assembly: 2-3 minutes per wrap
- Result: 5 restaurant-quality lunches from one 30-minute cooking session
- Cost Analysis: Approximately $3.50 per wrap versus $12-15 for takeout equivalent
Reheating Cooked Chicken:
- Microwave: Place in bowl, cover with damp paper towel, heat 60-90 seconds. Avoid overheating to prevent drying
- Skillet: Add 1 tablespoon water or broth, cover, heat over medium-low for 3-4 minutes—this method best preserves moisture and texture
- Air Fryer: 350°F for 3-4 minutes for slightly crispy exterior
Conclusion
The Spicy Chicken Wrap with Garlic Sauce & Crunchy Veggies delivers bold, restaurant-quality flavors in just 25 minutes for under $4 per serving. With 38g of protein, 32% daily fiber, and over 145% of your daily vitamin C, this wrap outperforms every fast-food alternative nutritionally while delivering superior taste, customizable heat levels, and exceptional meal-prep versatility for your entire week.
Ready to ditch the drive-through forever? Make this Spicy Chicken Wrap tonight and experience the difference that fresh, homemade ingredients make! Share your wrap creations and spice level choices in our review section below—we’d love to see how you’ve personalized this recipe with your favorite add-ins and variations. Leave a comment on our blog with any questions, and don’t forget to subscribe for more bold, protein-packed recipes delivered to your inbox weekly. Your tastiest, most satisfying wrap is just 25 minutes away!
FAQs
Q: How do I control the heat level of my Spicy Chicken Wrap?
A: Heat control in this recipe is highly flexible and operates on two independent levels—the chicken seasoning and the garlic sauce—giving you remarkable control over the final spice experience. For the chicken, cayenne pepper is your primary heat dial: use ¼ teaspoon for mild warmth, ½ teaspoon for medium heat, 1 teaspoon (as written) for genuine spiciness, and up to 1½ teaspoons for serious heat lovers. Smoked paprika adds flavor without heat, so you can always increase it without adding spiciness. For the sauce, the hot sauce quantity is equally adjustable—omit it entirely for a cooling, mild sauce that actually tempers the chicken’s heat, or add up to 1 tablespoon for a sauce with its own heat contribution. The avocado acts as a natural heat mediator—its fat content physically coats the tongue and reduces the perception of capsaicin heat. So if your wrap turns out spicier than expected, simply add more avocado slices. Fresh jalapeño slices can be added as an optional topping for those who want visible, controllable heat they can add to their own portion.
Q: Can I make this Spicy Chicken Wrap ahead of time for packed lunches?
A: Yes, with smart component-based prep that takes 5 minutes each morning rather than pre-assembling complete wraps. The challenge with pre-assembled wraps is moisture migration—the sauce and vegetables gradually release moisture that soaks into the tortilla, creating sogginess within 2-4 hours. Here’s the professional approach: Cook the chicken in a large batch on Sunday and refrigerate. Prepare the garlic sauce and store in a jar. Shred the cabbage and carrots (they stay crisp 3-4 days). Each morning, warm a tortilla, quickly reheat chicken (90 seconds in microwave), and assemble fresh in under 3 minutes. For true grab-and-go convenience, assemble the wrap completely but wrap tightly in aluminum foil and keep the avocado and cucumber in a small separate container to add at lunchtime. This approach maintains acceptable quality for 4-6 hours if refrigerated. For maximum freshness, assemble at your destination rather than at home.
Q: What’s the best tortilla for wrapping without tearing?
A: Tortilla selection and proper warming are the two most critical factors for tear-free wrapping. Choose large flour tortillas (10-12 inches, often labeled “burrito size”) as they provide enough surface area for generous fillings while still being rollable. The brand matters less than the size and freshness. Regarding warming—this is non-negotiable for tear prevention. Cold flour tortillas are essentially inflexible and will crack under the stress of rolling. Heat each tortilla for 30 seconds per side in a dry skillet over medium heat, or 15-20 seconds directly over a gas flame (using tongs), or 20-30 seconds wrapped in a damp paper towel in the microwave. The tortilla should feel noticeably softer and more pliable when properly warmed. Work immediately after warming. For gluten-free options, Siete’s almond flour tortillas warm and wrap well, though they’re slightly more delicate. Large collard green leaves work as a grain-free alternative but require a different wrapping technique (fold rather than roll).
Q: How long does the garlic sauce last and can I make it ahead?
A: The creamy garlic sauce is one of the best make-ahead elements of this recipe. It actually improves significantly with time as the flavors meld, deepen, and harmonize. Freshly made sauce is good, but 24-hour-refrigerated sauce is noticeably better. Store it in an airtight glass jar or container in the refrigerator for up to 5-7 days. Greek yogurt-based sauces last the full 7 days; mayonnaise-based sauces last 5-7 days. The garlic flavor intensifies over time, so if you prefer milder garlic presence, use the sauce on day 1-2; for maximum garlic impact, use it on day 3-4. Give the sauce a quick stir before each use as some natural separation may occur. For the freshest flavor with make-ahead convenience, combine all sauce ingredients except the garlic, store separately, and add freshly minced garlic the morning you plan to use it. This gives you the convenience of a pre-made sauce with the brightness of fresh garlic.
Q: Is there a good protein substitute for chicken in this wrap?
A: Absolutely—this wrap framework works beautifully with numerous protein alternatives, all using the same spice blend. For meat alternatives, thinly sliced flank steak or skirt steak (cook to medium for best tenderness) creates a heartier, more substantial wrap. Turkey breast strips cook even faster than chicken and have a slightly milder flavor. Large shrimp (cook for just 1-2 minutes per side) create an elegant, restaurant-worthy version. For plant-based proteins, extra-firm tofu (pressed for 30 minutes to remove moisture, then marinated in the spice blend and pan-fried) is the most similar in texture to chicken. Tempeh strips have a nutty, hearty quality and absorb spices beautifully. Crispy baked chickpeas (toss with spice blend, bake at 400°F for 25-30 minutes) provide satisfying crunch and plant protein. Black beans (canned, drained, and warmed with spices) create a budget-friendly vegetarian option. For the most dramatic plant-based alternative, buffalo cauliflower—roasted until golden and tossed in spices—creates a genuinely exciting wrap that even dedicated meat-eaters enjoy.
Q: How can I reduce the sodium in this Spicy Chicken Wrap?
A: This recipe contains approximately 720mg sodium per wrap—below the 1,000mg threshold but significant for those monitoring sodium intake. Several strategic reductions can lower this to approximately 450-480mg without compromising flavor. Replace half the salt in the chicken seasoning with lemon zest, which amplifies perceived saltiness through aroma without actual sodium. Use Greek yogurt (naturally lower sodium) rather than mayonnaise as the sauce base—this alone saves 150mg sodium. Choose low-sodium or no-salt-added hot sauce varieties. Use fresh garlic rather than garlic powder (which sometimes contains added salt). Select low-sodium tortillas (brands vary significantly—check labels, as sodium can range from 200-500mg per tortilla). Season the vegetables with lime juice and fresh herbs rather than salt. These modifications collectively reduce sodium by 35-40% while maintaining the bold, satisfying flavor that makes this wrap exceptional.
Print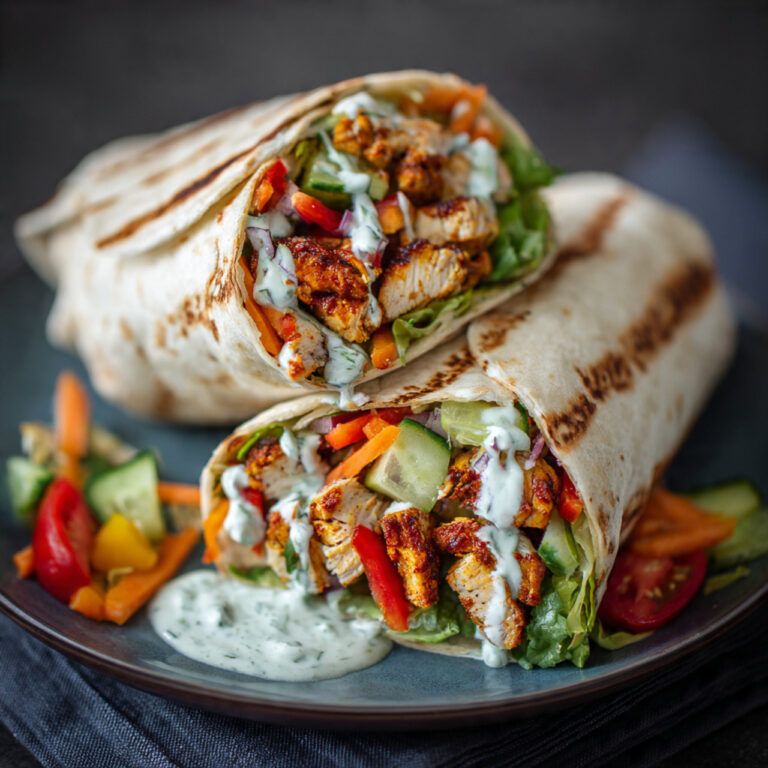
Spicy Chicken Wrap with Garlic Sauce & Crunchy Veggies
Ditch the drive-through forever with this incredible Spicy Chicken Wrap with Garlic Sauce & Crunchy Veggies! Ready in just 25 minutes for under $4 per serving, this bold, restaurant-quality wrap combines tender strips of cayenne-spiced chicken, creamy roasted garlic sauce, and a vibrant rainbow of crisp fresh vegetables all rolled in a warm golden tortilla. Packed with 38g of protein, 145% daily vitamin C, and 32% daily fiber, this wrap fuels your afternoon without the 2 PM energy crash. Fully customizable for keto, vegan, gluten-free, and low-calorie diets. Perfect for meal prep, weekday lunches, family dinners, or casual entertaining. Once you make this at home, takeout wraps will never satisfy you again!
- Total Time: 25 minutes
- Yield: 4 wraps (4 servings)
Ingredients
Spicy Chicken:
- 1.5 pounds boneless, skinless chicken breasts, sliced into thin ½-inch strips
- 2 tablespoons olive oil, divided
- 1 teaspoon cayenne pepper (adjust to heat preference)
- 1 teaspoon smoked paprika
- 1 teaspoon garlic powder
- 1 teaspoon onion powder
- ½ teaspoon ground cumin
- ½ teaspoon dried oregano
- 1 teaspoon salt
- ½ teaspoon black pepper, freshly ground
- Juice of 1 fresh lime
Creamy Garlic Sauce:
- ½ cup Greek yogurt or mayonnaise
- 3 cloves garlic, minced (or roasted for sweeter, mellower flavor)
- 2 tablespoons fresh lemon juice
- 1 tablespoon olive oil
- 1 teaspoon hot sauce (Tabasco, Frank’s RedHot, or Sriracha)
- 1 tablespoon fresh parsley or cilantro, finely chopped
- Salt and pepper to taste
- 1 teaspoon honey (optional, balances heat)
Crunchy Veggie Filling:
- 2 cups shredded purple cabbage
- 1 large red bell pepper, thinly sliced
- 1 medium cucumber, julienned into matchsticks
- 1 cup shredded carrots
- 2 cups fresh romaine lettuce, shredded or torn
- 1 ripe avocado, sliced just before assembly
- ¼ cup red onion, thinly sliced
- Fresh cilantro or parsley for garnish
For Wrapping:
- 4 large flour tortillas (10-12 inch burrito size)
- Optional additions: shredded pepper jack cheese, fresh jalapeño slices, pickled red onions, lime wedges for serving
Instructions
- Season the chicken: Slice chicken breasts into thin, uniform strips approximately ½ inch wide and 3-4 inches long. Pat completely dry with paper towels. In a medium bowl, combine cayenne, smoked paprika, garlic powder, onion powder, cumin, oregano, salt, black pepper, 1 tablespoon olive oil, and lime juice. Mix to form a fragrant spice marinade. Add chicken strips and toss thoroughly until every piece is evenly coated in the rust-red mixture. Let marinate for at least 5 minutes while preparing remaining components.
- Make the garlic sauce: In a small bowl, combine Greek yogurt or mayonnaise, minced or roasted garlic, fresh lemon juice, olive oil, hot sauce, chopped fresh herbs, salt, pepper, and optional honey. Whisk vigorously until completely smooth and well combined. Taste and adjust seasoning—add more lemon for brightness, more hot sauce for heat, or more honey for sweetness. Cover and refrigerate while cooking chicken to allow flavors to develop and meld together.
- Prepare the crunchy vegetables: Shred purple cabbage into thin strips using a sharp knife or mandoline slicer. Julienne cucumber into matchstick-sized pieces. Slice red bell pepper into thin strips. Shred carrots if not pre-shredded. Tear or roughly chop romaine lettuce into manageable pieces. Pat all vegetables completely dry with paper towels. Reserve avocado slicing until just before assembly to prevent browning. For extra crunch, soak cabbage and carrots in ice water for 10 minutes then drain and pat completely dry.
- Cook the spiced chicken: Heat large cast-iron skillet or heavy-bottomed pan over medium-high heat until very hot (about 2 minutes). Add remaining 1 tablespoon olive oil and let shimmer for 30 seconds. Add marinated chicken strips in a single layer without overcrowding—cook in two batches if necessary. Cook completely undisturbed for 2-3 minutes on first side until a deeply golden-brown crust forms with slightly charred spice edges. Flip each strip and cook additional 2-3 minutes until internal temperature reaches 165°F. Let chicken rest for 2-3 minutes before serving.
- Warm the tortillas: Heat each tortilla using your preferred method: directly over a gas flame for 15-20 seconds per side using tongs (creates beautiful char marks), in a dry skillet over medium heat for 30 seconds per side, or wrapped in a damp paper towel and microwaved for 20-30 seconds. Tortilla should feel warm, soft, and noticeably pliable—not stiff or brittle. Keep warmed tortillas covered under a clean kitchen towel to maintain warmth and flexibility until ready to use.
- Spread the garlic sauce: Lay one warm tortilla flat on a clean surface. Using a large spoon or spatula, spread 2-3 tablespoons of creamy garlic sauce generously across the center third of the tortilla in a horizontal band, leaving a 1.5-inch border clear around all edges. The sauce acts as both flavor base and adhesive that holds fillings in place during rolling and eating.
- Layer the fillings strategically: Begin layering fillings directly on top of the garlic sauce in this specific order for best structure and flavor distribution: first add a generous layer of shredded romaine lettuce as a moisture barrier between sauce and wetter ingredients; next add 4-5 spiced chicken strips arranged horizontally; then add shredded purple cabbage, carrots, red bell pepper strips, cucumber matchsticks, and red onion slices; finish with avocado slices pressed gently against the other fillings. Drizzle an additional tablespoon of garlic sauce over all fillings. Add optional cheese or jalapeños at this stage.
- Roll, cut and serve: Fold both sides of the tortilla inward toward center approximately 1.5 inches. Beginning at the bottom edge closest to you, roll the tortilla upward firmly while gently pulling the filling toward you to keep everything compact and tightly packed. The folded sides will prevent ingredients from escaping through the ends. For the sharpest, most secure wrap, roll tightly in aluminum foil and press gently for 1 minute. Using a sharp chef’s knife in one clean downward motion, cut diagonally at a 45-degree angle. Place both halves cut-side forward on serving board. Serve immediately with extra garlic sauce for dipping and lime wedges for squeezing.
Notes
Heat Level Guide:
- Mild (family-friendly): ¼ teaspoon cayenne, no hot sauce in sauce
- Medium (pleasantly spicy): ½ teaspoon cayenne, 1 teaspoon hot sauce
- Hot (restaurant-quality heat): 1 teaspoon cayenne (as written), 1 teaspoon hot sauce
- Fiery (serious heat lovers): 1½ teaspoons cayenne, 1 tablespoon hot sauce, add fresh jalapeños
Ingredient Substitutions:
- Chicken: Boneless thighs (juicier), turkey breast, flank steak, shrimp (cook 1-2 min per side), firm tofu, or crispy chickpeas
- Tortilla: Whole wheat wrap, spinach tortilla, low-carb tortilla, or large butter lettuce leaves
- Greek yogurt: Sour cream, vegan mayonnaise, tahini, or cashew cream
- Hot sauce: Any brand works; chipotle sauce adds smokier flavor profile
- Avocado: Prepared guacamole works as a convenient alternative
- Purple cabbage: Green cabbage or pre-made coleslaw mix
Critical Success Tips:
- ALWAYS pat chicken completely dry before seasoning for maximum searing
- NEVER overcrowd the pan—cook chicken in batches if needed for proper golden crust
- ALWAYS warm tortillas immediately before wrapping—cold tortillas crack and tear
- Slice chicken AGAINST the grain for maximum tenderness
- Add avocado LAST, just before rolling, to prevent browning
- Let cooked chicken REST 2-3 minutes before assembling for juicier result
Roasted Garlic Sauce Upgrade: Cut top off whole garlic head, drizzle with olive oil, wrap in foil, roast at 400°F for 35-40 minutes until golden and caramelized. Squeeze soft cloves into sauce for sweeter, more complex flavor that’s less sharp than raw garlic version.
Dietary Variations:
- Keto/Low-Carb: Use large lettuce leaves or collard green wraps instead of tortillas (reduces to 12g net carbs)
- Vegan: Use crispy spiced chickpeas or marinated tempeh, cashew cream sauce, all vegetables unchanged
- Gluten-Free: Use certified GF tortillas (Siete brand recommended) or lettuce wraps
- Lower Sodium: Reduce salt by half, use lime zest for flavor, choose low-sodium hot sauce (saves ~270mg sodium)
- Higher Protein: Double chicken portion, add cottage cheese filling, use protein-fortified tortillas
Sauce Make-Ahead Tips:
- Prepare sauce up to 7 days in advance—flavors improve significantly after 24 hours
- Garlic intensifies over time; for milder garlic taste use sauce day 1-2, for bold garlic use day 3-4
- Store in sealed glass jar in refrigerator; stir before each use
- For freshest result: mix all sauce ingredients except garlic; add fresh garlic morning of use
Meal Prep Strategy:
- Sunday: Cook 3 pounds spiced chicken, prepare full garlic sauce batch, shred cabbage and carrots
- Daily: Slice fresh bell pepper, cucumber, and avocado (5 minutes maximum)
- Assembly: 2-3 minutes per wrap using pre-prepped components
- Cost: Approximately $3.50 per wrap vs $12-15 for takeout equivalent
- Weekly savings: $42-$46 for 4 lunches per week
Storage Instructions:
- Cooked chicken: Refrigerator 4-5 days in airtight container; Freezer 3 months
- Garlic sauce: Refrigerator 5-7 days in sealed jar
- Shredded vegetables: Refrigerator 3-4 days in airtight containers
- Assembled wraps: Maximum 24 hours refrigerated, wrapped tightly in aluminum foil
- Do NOT freeze: Assembled wraps, fresh vegetables, avocado, or garlic sauce
Reheating Chicken:
- Microwave: Cover with damp paper towel, 60-90 seconds at 80% power
- Skillet (best): Add 1 tablespoon water or broth, cover, medium-low heat 3-4 minutes
- Air fryer: 350°F for 3-4 minutes for slightly crispy exterior
- Prep Time: 10 minutes
- Cook Time: 10 minutes
- Category: Main Course
- Method: Braising, Stovetop
- Cuisine: American
- Diet: Gluten-containing, High-Protein